Requirements engineering becomes clearer when I use the right tools for the right purpose. I need diagrams to explain ideas, documentation to preserve knowledge, tickets to track work, and process models to understand business flows. Therefore, tools like draw.io, Confluence, Jira, and Camunda help me turn scattered information into structured project work.
In this guide, I explore how these tools support my daily work as a Requirements Engineer. I use draw.io to create visual models, Confluence to document decisions, Jira to manage tasks, and Camunda to model processes with BPMN. As a result, I can move from an unclear idea to a shared understanding, and then to practical implementation.
However, tools only create value when I use them with a clear strategy. That is why this overview connects tutorials, workflows, and practical examples into one learning path. Step by step, I show how each tool supports better communication, stronger collaboration, and more reliable requirements engineering.
draw.io Tutorials
draw.io helps me create diagrams that explain ideas faster than long text. I use it for processes, requirements, UML models, technical structures, and visual documentation. Therefore, I need a clear learning path from simple diagram creation to advanced publishing. This draw.io tutorial section helps me learn the tool step by step and use every feature with more confidence.

Getting Started with draw.io
Before I create diagrams, I need to understand how I access the tool. draw.io runs in the browser and also connects with different working environments. Therefore, I start with the basic entry point. I use Why to Access the draw.io Website as the first step in this learning path.
After that, I learn how a new diagram begins. I start with How to Create a Blank Diagram in draw.io because it gives me full control. Then I use How to Create a Diagram using Templates in draw.io to start faster. As a result, I can choose between a clean canvas and a ready-made structure.
I also need to reopen work that already exists. Therefore, I use How to Open an Existing Diagram in draw.io early in this section. This helps me continue older diagrams without confusion. A strong start in draw.io means I know how to access, create, and reopen diagrams.
File Handling and Storage
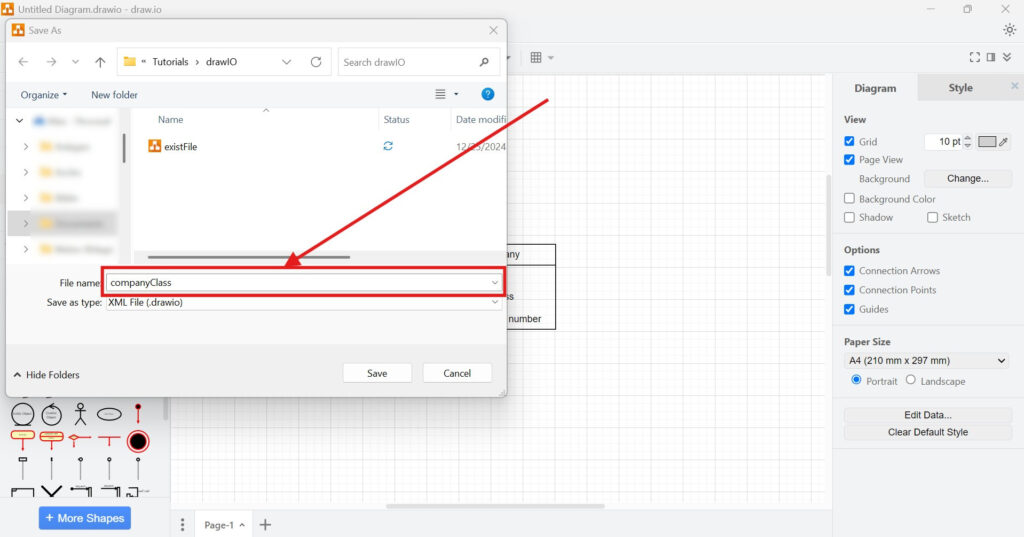
After I create a diagram, I need to save it correctly. A diagram only creates value when I can find and reuse it later. Therefore, I continue with How to Save Files in draw.io. File handling gives every draw.io workflow a stable foundation.
Next, I use How to Synchronize in draw.io: A Step-by-Step Guide. Synchronization helps me keep diagram changes aligned with storage locations. In addition, it reduces the risk of outdated diagram versions. As a result, I can work with more trust.
I also need better file control. Therefore, I use Renaming a File in draw.io: A Simple Step-by-Step Guide. Then I add How to Change Draw.io File Properties. These topics help me manage names, settings, and file behavior more clearly.
Importing Existing Content
Many diagrams do not start from zero. Sometimes I reuse existing files, external formats, or older diagrams. Therefore, I need a clear import workflow. Importing helps me bring existing diagram content into draw.io without rebuilding everything manually.

I use How to Import into draw.io: A Comprehensive Guide in this part. It shows me how external content enters the tool. In addition, it helps me avoid mistakes before editing starts. As a result, I can continue work from existing material.
Page Setup and Diagram Structure
After I import or create content, I need a clean page structure. Page settings influence how the diagram looks, prints, and exports. Therefore, I use How to Change the Draw.io Page Setup. A clear page setup helps me control the visual frame of my diagram.
Then I use Adding and Using a New Page Tab in draw.io. Page tabs help me split larger topics into smaller diagram pages. In addition, they keep related diagrams inside one file. As a result, I can organize complex content without creating too many files.
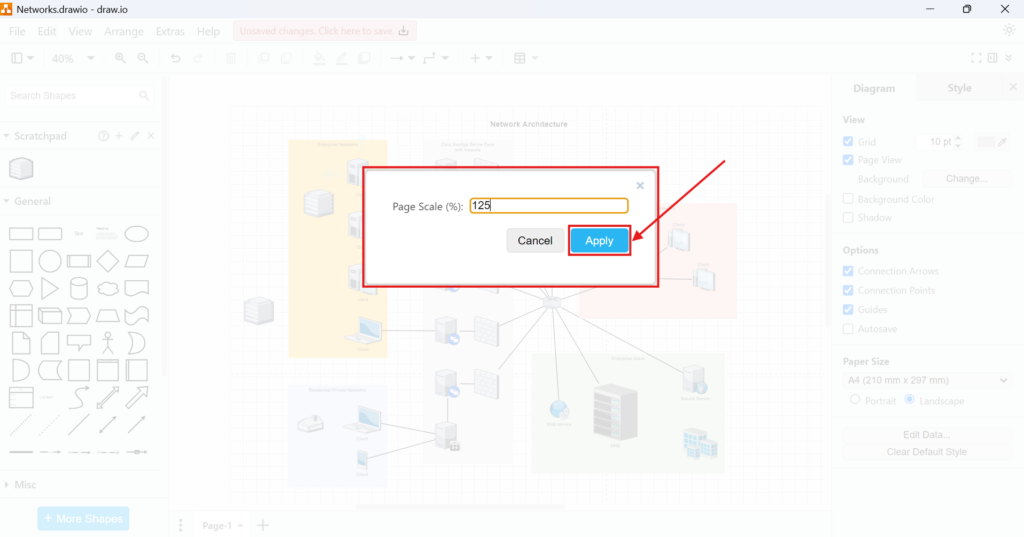
I also use How to Change the Page Scale in draw.io. Then I add How to Change the Grid Units in draw.io. These topics help me control size, proportion, and layout precision. Therefore, my diagrams become easier to align and present.
Basic Editing Actions
Once the diagram structure exists, I need fast editing skills. Small editing actions shape most daily work in draw.io. Therefore, I learn them before I focus on advanced features. Basic editing actions help me work faster and avoid unnecessary frustration.
I start with How to Undo or Redo Editing in draw.io. This topic helps me correct mistakes quickly. Then I use Mastering Cut, Copy, Paste, and Delete in draw.io. As a result, I can change diagram content without losing control.

Next, I use How to Duplicate in draw.io. Duplication helps me repeat similar shapes and patterns faster. In addition, I use Selecting Options in draw.io to handle elements more precisely. This makes larger diagrams easier to edit.
I also use How to Lock or Unlock Objects in draw.io. Locked objects help me protect important parts of a diagram. Then I use How to Find and Replace in draw.io. Find and replace helps me update labels and terms more efficiently.
Keyboard shortcuts also belong in this foundation. Therefore, I use Mastering Keyboard Shortcuts in draw.io. Shortcuts reduce repetitive mouse work. As a result, I can model faster and stay focused on the diagram logic.
Shapes, Connections, and Visual Behavior
After I know the editing basics, I need to shape diagram content. Shapes, arrows, connection points, and geometry define the visual meaning. Therefore, I move from general editing to diagram construction. draw.io becomes more powerful when I understand how shapes and connectors behave.
I use How to Change Geometry in draw.io to control shape form and dimensions. Then I add Connection Arrows and Points in draw.io. This topic helps me connect shapes clearly. As a result, my diagrams show relationships with less ambiguity.
I also use How to Add and View Connector Animations in draw.io. Connector animations can make flows easier to follow. However, I use them only when they improve understanding. Therefore, they support clarity instead of decoration.
Styles and Visual Design
A diagram should not only contain correct information. It should also guide the reader through that information. Therefore, I need consistent styles and visual rules. Good styling helps me make draw.io diagrams clearer, calmer, and easier to understand.
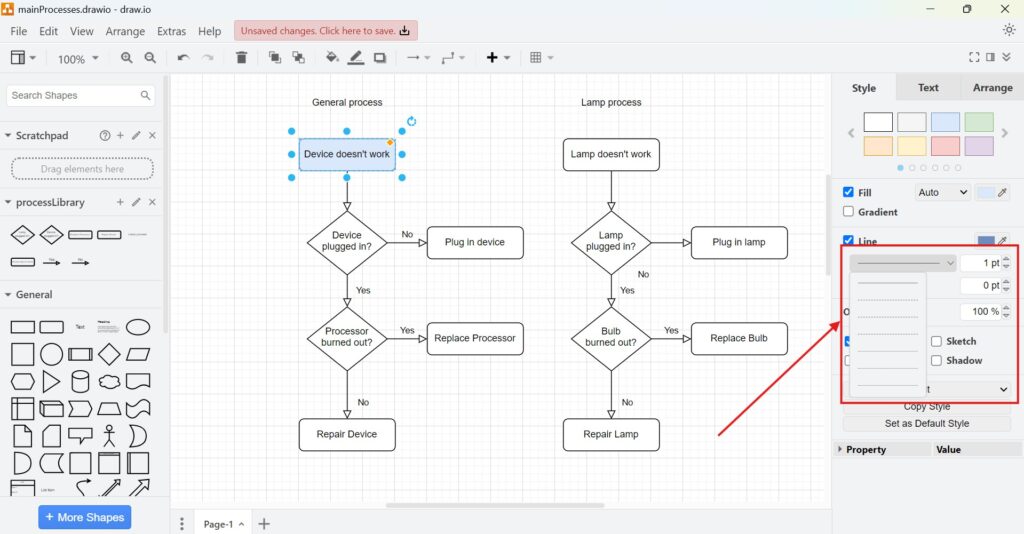
I use Mastering Styles in Draw.io to control colors, lines, text, and visual patterns. This helps me create a consistent diagram language. In addition, it makes related elements easier to recognize. As a result, the diagram looks more professional.
I also use How to Activate the Format View in draw.io. The format view gives me direct access to visual settings. Therefore, I can adjust selected elements faster. This supports clean diagrams with less manual effort.
Views for Finding and Organizing Elements
As diagrams grow, I need better navigation. Large diagrams can quickly become hard to manage. Therefore, I use views that help me find, inspect, and structure content. draw.io views help me control complexity inside larger diagrams.
I start with How to activate the “Shapes” view in draw.io. Then I use How to activate the “Search Shapes” view in draw.io. These topics help me find the right diagram elements faster. As a result, I spend less time searching.
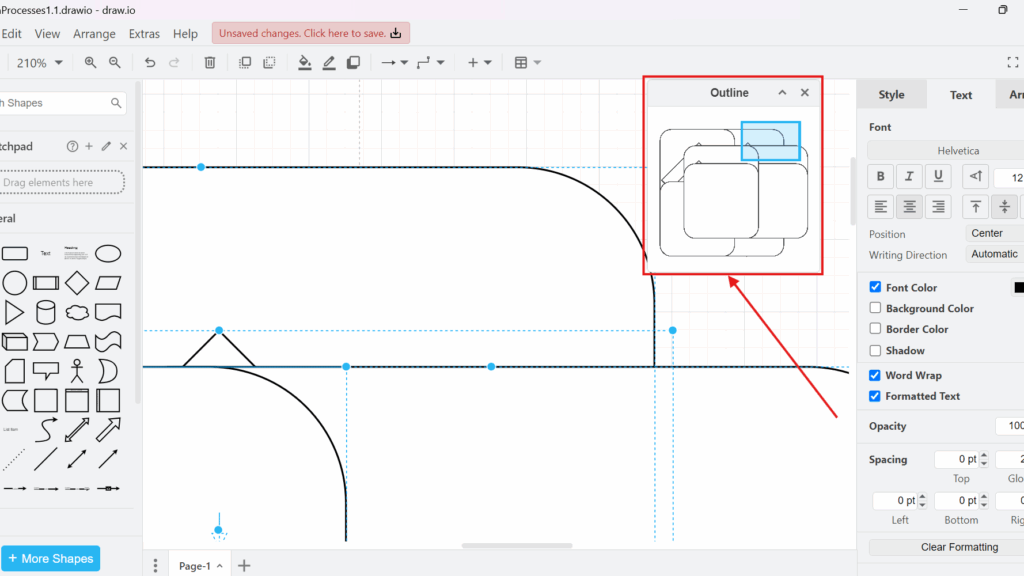
I also use How to Use the “Scratchpad” View in draw.io. The scratchpad helps me reuse custom shapes and diagram parts. In addition, I use How to Activate the Outline View in draw.io. The outline view helps me navigate larger diagrams more easily.
Layers, Tags, and Metadata
Some diagrams need more structure than visible shapes can show. Therefore, I use layers, tags, metadata, and tooltips. These features help me organize hidden meaning and diagram behavior. Advanced organization features help me manage complex draw.io diagrams with more precision.
I use How to Use Layers in draw.io when one diagram needs several visual levels. Layers help me separate background, structure, notes, and alternatives. In addition, they help me show or hide content. As a result, I can explain complex diagrams step by step.
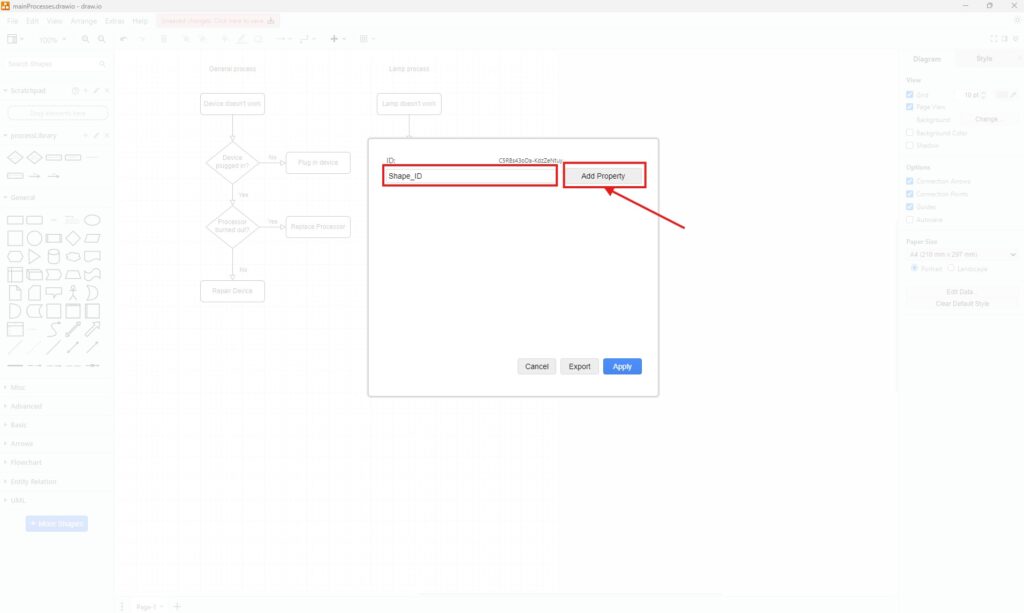
Then I use How to Use the Tags View in draw.io. Tags help me classify shapes and find related elements. I also use Manage Metadata in Draw.io: A Simple Guide. Metadata adds extra information behind the visible diagram.
Tooltips can also improve understanding. Therefore, I use How to Edit Tooltip in draw.io: A Simple Guide. Then I add How to Activate the Tooltips View in draw.io. These articles help me explain diagram elements without overloading the canvas.
Grid, Guides, Ruler, and View Control
Precise diagrams need visual alignment. Without alignment, diagrams can look messy even when the content makes sense. Therefore, I use grid, guides, ruler, zoom, and reset options. View control helps me place diagram elements neatly and review diagrams more comfortably.
I start with How to Activate the Grid View in draw.io. Then I use How to Activate and Use Guide in draw.io. Grid and guide features help me align elements more accurately. As a result, the diagram becomes easier to scan.

I also use How to Activate and Use the Ruler View in draw.io. The ruler helps me position content with more awareness. After that, I use How to Zoom in and Zoom out in draw.io. Zoom helps me switch between detail work and overview.
Finally, I add How to Reset the View in draw.io – Mastering View Control. Resetting the view helps me recover orientation. Therefore, I can return to a clearer workspace when the view feels confusing.
Exporting Diagrams as Image Files
After I create a diagram, I often need to publish it. Image exports help me add diagrams to articles, documents, tutorials, and presentations. Therefore, I start with common image formats. Export options help me turn draw.io diagrams into reusable content for different channels.
I use How to Export a Diagram as PNG in draw.io for general image use. PNG works well for many online and documentation needs. Then I use How to Export a Diagram as JPEG in draw.io. JPEG can help when I need smaller image files.
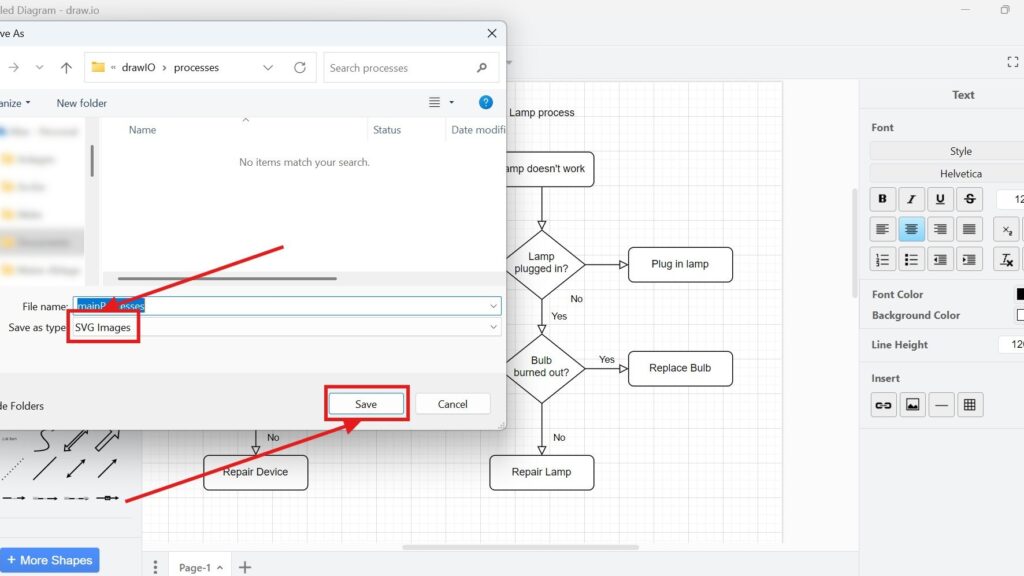
I also use How to Export a Diagram to WebP in draw.io. WebP supports modern web performance goals. In addition, I use How to Export a Diagram to SVG in draw.io. SVG helps me keep diagrams sharp at different sizes.
Exporting Diagrams for Documents and Tools
Some export formats serve special purposes. I may need printable documents, editable formats, web output, or diagram source files. Therefore, I continue with more specific export options. Different export formats help me reuse one draw.io diagram in many professional contexts.
I use How to Export a Diagram to PDF in draw.io when I need a printable result. PDF works well for sharing stable versions. Then I use How to Export a Diagram to VSDX in draw.io. VSDX helps when I need compatibility with Microsoft Visio workflows.
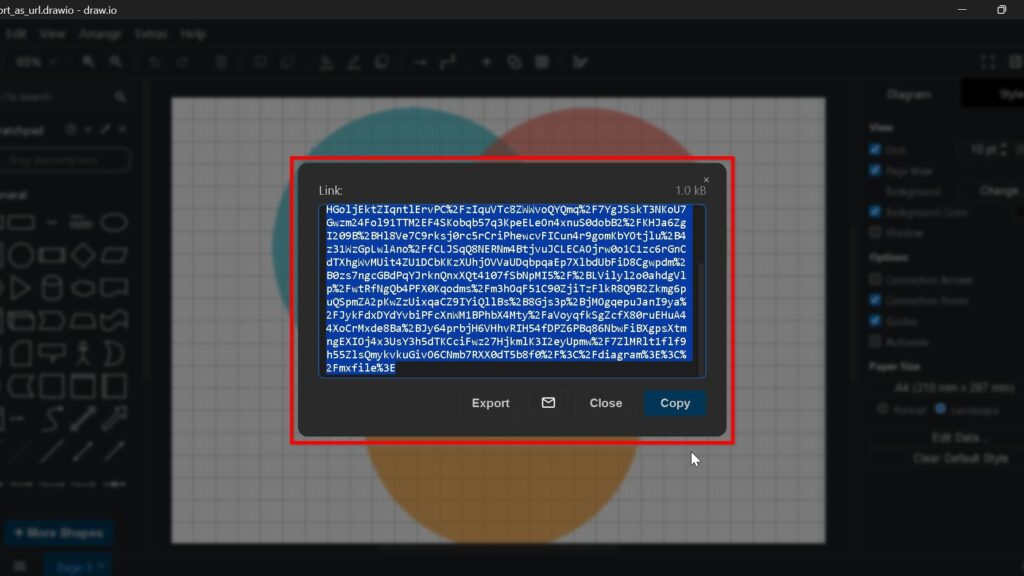
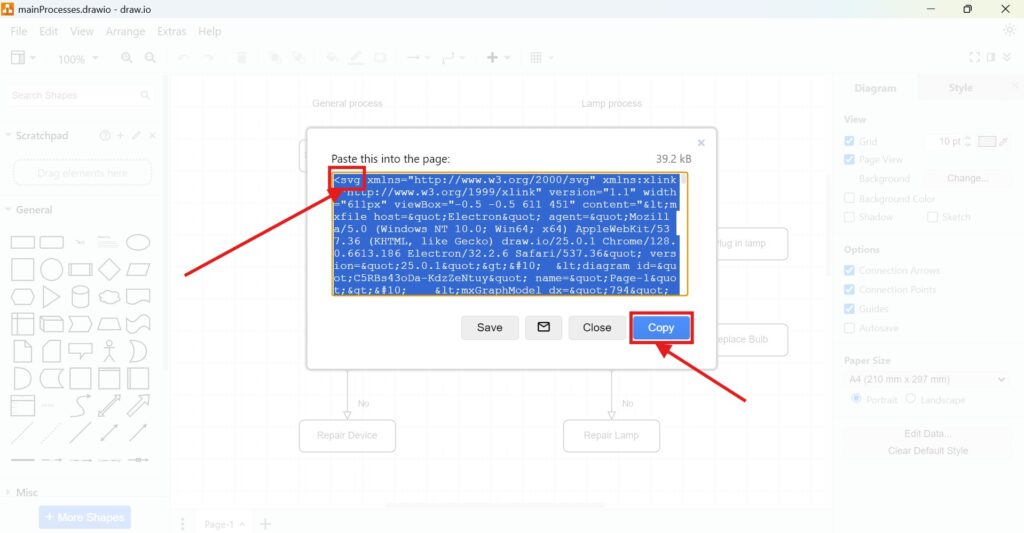
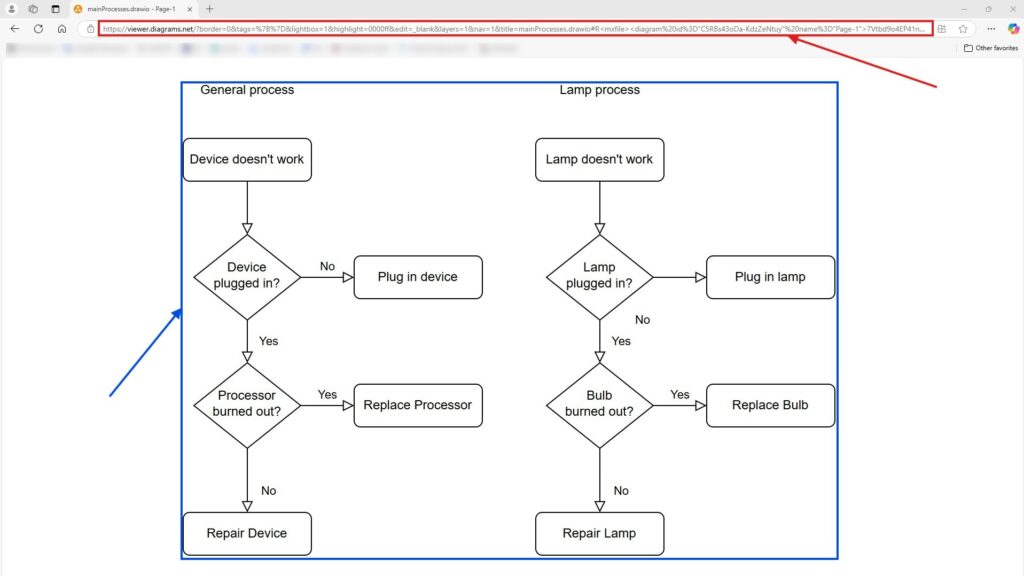
I also use How to Export a Diagram to HTML in draw.io. HTML exports can support interactive diagram sharing. In addition, I use How to Export a Diagram to URL in draw.io. A URL export can make sharing easier in some situations.
Finally, I use How to Export a Diagram as XML in draw.io. XML helps me preserve the diagram source structure. Therefore, this topic matters when I need technical reuse or backup options.
Embedding draw.io Diagrams
Exporting creates files, but embedding brings diagrams into pages. I use embedding when I want diagrams inside articles, documentation, or web content. Therefore, this cluster connects draw.io with publishing workflows. Embedding helps me place draw.io diagrams directly where readers need them.
I start with How to Embed a draw.io Diagram with an <img> HTML Tag. This article helps me place an exported diagram as an image. Then I use How to Embed a draw.io <svg> Image Tag. SVG embedding can keep diagrams clean and scalable.
Next, I use How to Embed a Draw.io Diagram with HTML. This gives me a broader embedding approach. In addition, I use How to Embed an IFrame draw.io Diagram. An IFrame can support more interactive or separated diagram display.
Microsoft Office and Notion Workflows
draw.io does not only support web publishing. I can also connect diagrams with office documents and knowledge tools. Therefore, I include integrations after export and embedding. Integrations help me reuse draw.io diagrams inside the tools where work already happens.
I use How to Add the draw.io Add-on to Your Microsoft Office Apps first. This topic explains the setup for Office usage. Then I use How to Use draw.io in Microsoft Office Word. As a result, I can bring diagrams into written documentation.
I also use How to Use Links to Notion Draw.io Diagrams. Notion can support lightweight documentation and knowledge bases. Therefore, linked diagrams help me connect visual models with notes, pages, and project content.
Libraries and Reusable Diagram Assets
When I create many diagrams, I need reusable assets. Libraries help me save shapes, patterns, and visual building blocks. Therefore, I include libraries after the core creation workflow. draw.io libraries help me create diagrams faster and keep visual elements consistent.
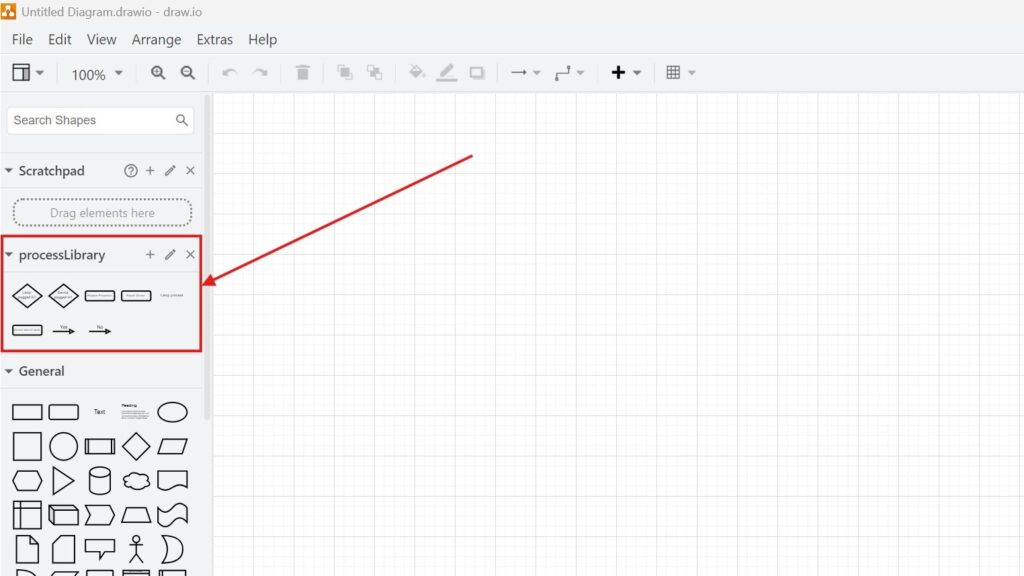
I start with How to Create a Library in Draw.io. This article helps me build my own reusable shape collection. Then I use How to Open a Library in Draw.io: A Step-by-Step Guide. As a result, I can access saved diagram assets when I need them.
Libraries support consistency across many articles and tutorials. They also reduce repetitive work. In addition, they help me keep diagrams visually aligned. Therefore, libraries become especially useful for long-term documentation work.
Flowcharts and Process Examples
After the tool foundation, I can apply draw.io to real diagram types. Flowcharts give me a simple and practical starting point. They help me explain steps, decisions, and paths. Flowcharts help me turn process logic into a clear visual sequence.
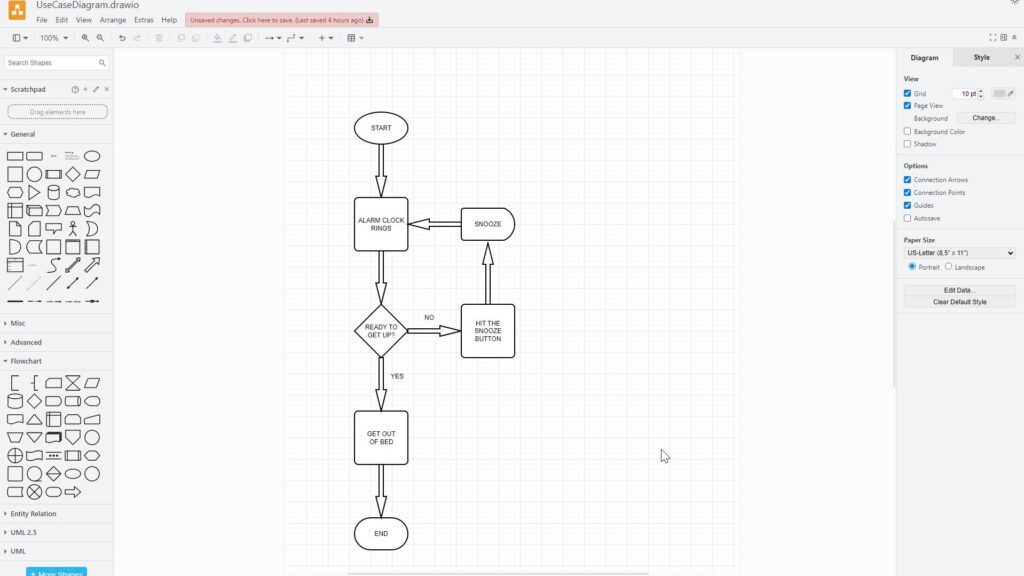
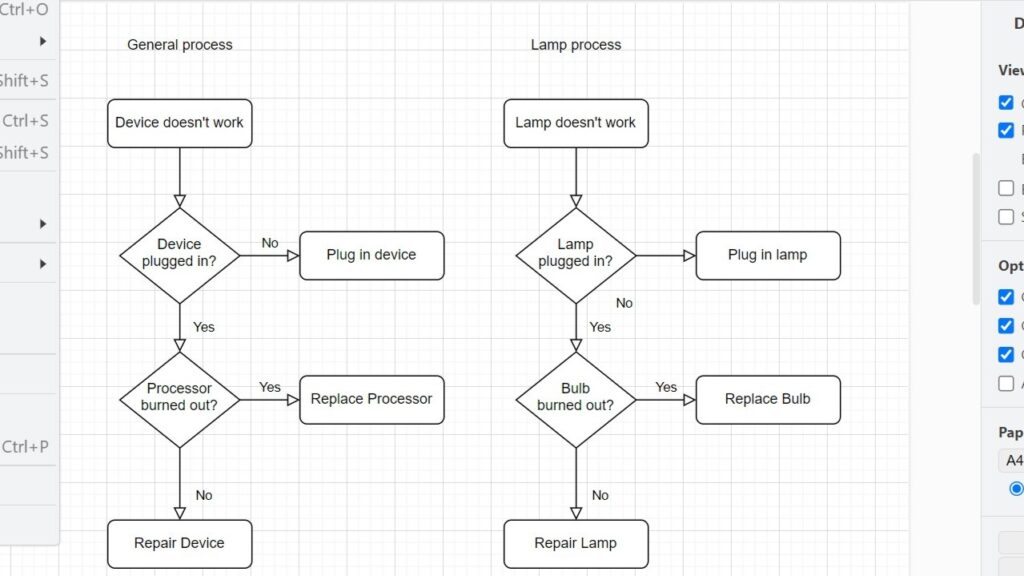
I use How to Create a Flowchart Example with draw.io in this section. This topic shows how basic shapes create understandable process logic. In addition, it connects tool skills with real modeling work. As a result, readers can practice with a concrete example.
Flowcharts also prepare readers for more formal modeling topics. They show decisions, activities, and outcomes. Therefore, they create a bridge between simple diagrams and structured modeling. This makes the learning path more natural.
UML Modeling with draw.io
After flowcharts, I move into UML topics. UML diagrams need more structure, terms, and modeling discipline. Therefore, I cluster these articles in a dedicated modeling section. UML tutorials show how draw.io supports structured software and requirements modeling.
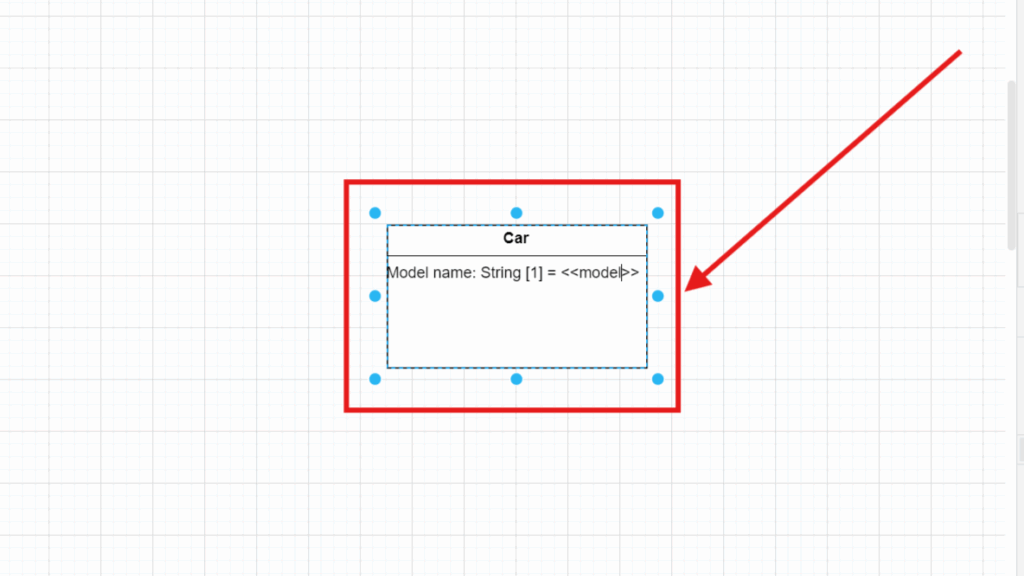
I start with Syntax and Semantics of UML Classes in draw.io. This topic explains the meaning behind class diagram elements. Then I use Model UML Classes in draw.io. As a result, I can create class structures with clearer modeling intent.
Next, I use Model UML Class Attributes in draw.io. Attributes help me describe what a class knows. In addition, I use How to Build a UML Class Diagram with draw.io. This article brings the class modeling topics together.
I also add Draw UML Use Case Diagrams with draw.io: A Hands-on Example. Use case diagrams focus on users and system interactions. Therefore, they complement class diagrams well. Together, these UML tutorials support structure and behavior-oriented thinking.
Printing, Closing, and Exiting
A complete workflow also needs finishing steps. I need to print diagrams, close files, and exit the tool correctly. These topics look simple, but they support everyday confidence. Finishing steps help me complete draw.io work without losing orientation or results.
I use How to Print a Draw.io Diagram when I need a physical or PDF-oriented output. Printing depends on page setup and scale. Therefore, this topic connects back to layout control. As a result, I can prepare diagrams for review or documentation.
Then I use How to Close a Draw.io Diagram. Closing matters when I switch between files or finish a task. Finally, I use How to Exit draw.io. This completes the basic work cycle from access to finished diagram handling.
Presentation and Communication
At the end, I focus on presentation. A diagram only creates value when people can understand it. Therefore, I need a clean way to show diagrams to others. Presentation mode helps me turn a draw.io diagram into a focused visual explanation.
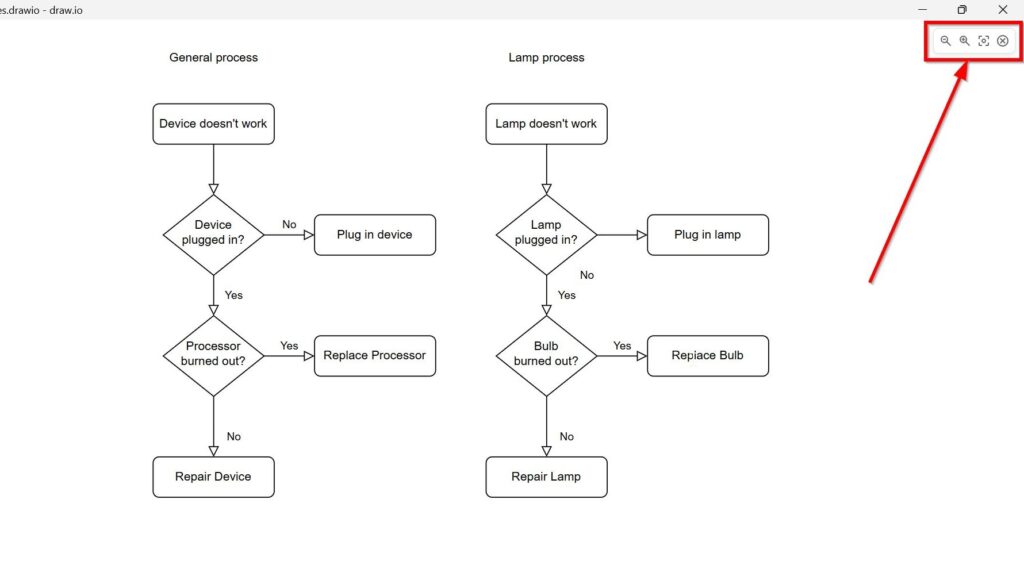
I use How to Activate the Presentation Mode in draw.io as the final topic. This article shows how I present diagrams without unnecessary editor distractions. In addition, it helps me guide viewers through the visual content. As a result, draw.io becomes not only a drawing tool, but also a communication tool.
This final topic connects the whole tutorial path. I start with access, creation, editing, structure, export, embedding, and modeling. Then I end with presentation. Therefore, the draw.io tutorial section supports the full diagram lifecycle.
hier
Confluence Tutorials
Confluence helps me create, structure, and share knowledge in one central place. I use it when teams need clear pages, shared decisions, and reusable documentation. Therefore, I treat Confluence as a practical tool for collaboration, requirements work, and project communication. Confluence gives me a structured place to turn scattered knowledge into useful team documentation. Start your Confluence journey with “What is Confluence?“
Confluence Basics and First Orientation
Before I create content, I need access and orientation. I start with How to Access Confluence and Jira for Free because it removes the first technical barrier. Then I use The Power of Confluence to understand why this tool matters for teamwork. I first need to understand what Confluence can do before I build larger documentation structures.
After that, I move to The Confluence Dashboard. The dashboard helps me find recent work, spaces, pages, and updates. In addition, it gives me a clear entry point into daily collaboration. The Confluence Dashboard helps me navigate work faster and stay connected with team content.
I also use How to Use Shortcuts in Confluence early in the learning path. Shortcuts help me work faster without searching through menus. As a result, I can create, edit, and navigate pages with less friction. Shortcuts make Confluence easier to use during daily documentation work.
Confluence Spaces and Site Structure
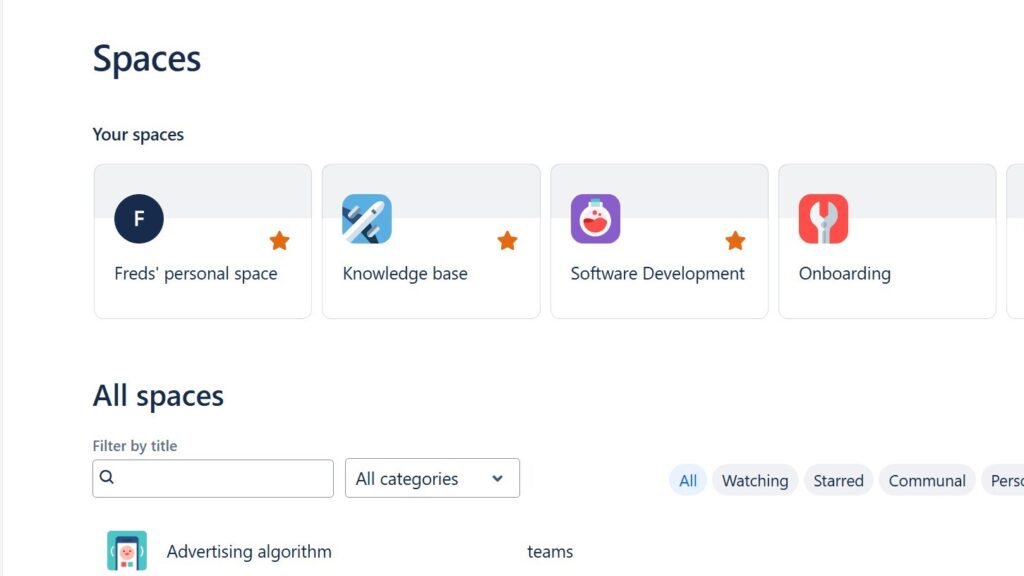
After I understand the basics, I need to organize content. Spaces help me separate teams, projects, products, or knowledge areas. Therefore, I treat spaces as the main structure around Confluence content. Spaces help me keep related pages together and make information easier to find.
I start with Spaces in Confluence because it explains the concept first. Then I use How to Create a Space in Confluence to build my own space step by step. After that, How to Create a Confluence Space from a Template helps me start faster. Templates help me create structured spaces without starting from a blank page.
This cluster matters because poor structure creates confusion later. However, a clear space structure supports navigation, ownership, and long-term maintenance. In addition, it helps teams find important pages without wasting time. A well-planned Confluence space makes documentation easier to manage over time.
Confluence Pages and Content Creation
Once the space exists, I need to create useful pages. I start with How to Create a Confluence Page because pages form the heart of Confluence. Then I use How to Delete a Page in Confluence: A Step-by-Step Guide to manage content responsibly. Pages help me capture knowledge, decisions, requirements, and project information in a clear format.
Creating pages sounds simple. However, clear pages need structure, readable text, and useful hierarchy. Therefore, I connect basic page creation with editing tutorials right away. A Confluence page only helps when readers can understand it quickly.
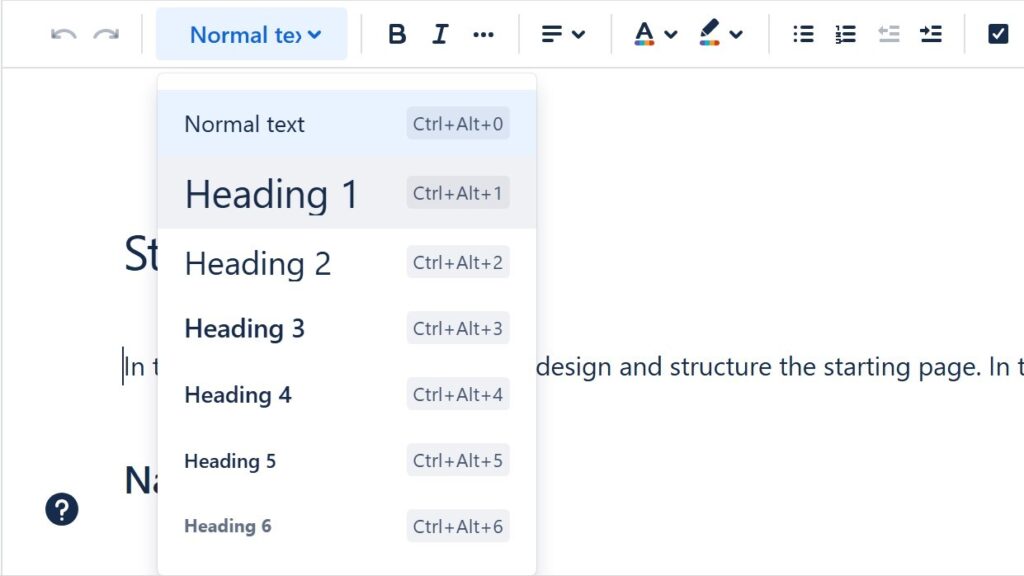
I use How to Change the Headings in Confluence to structure longer content. Headings help me divide a page into logical sections. As a result, readers can scan the page and jump to relevant parts. Clear headings turn a long Confluence page into an easy-to-read knowledge asset.
Confluence Text Formatting and Readability
After I create pages, I improve their readability. I use How to Format Text in Confluence to learn the basic formatting options. Then I use How to Make Lists in Confluence to present steps, options, and grouped information. Good formatting helps me make Confluence pages clearer and more useful.
Lists matter because teams often need checklists, requirements, decisions, and action points. In addition, lists make complex content easier to scan. Therefore, I use them when plain paragraphs become too dense. Lists help me explain information in a structured and practical way.
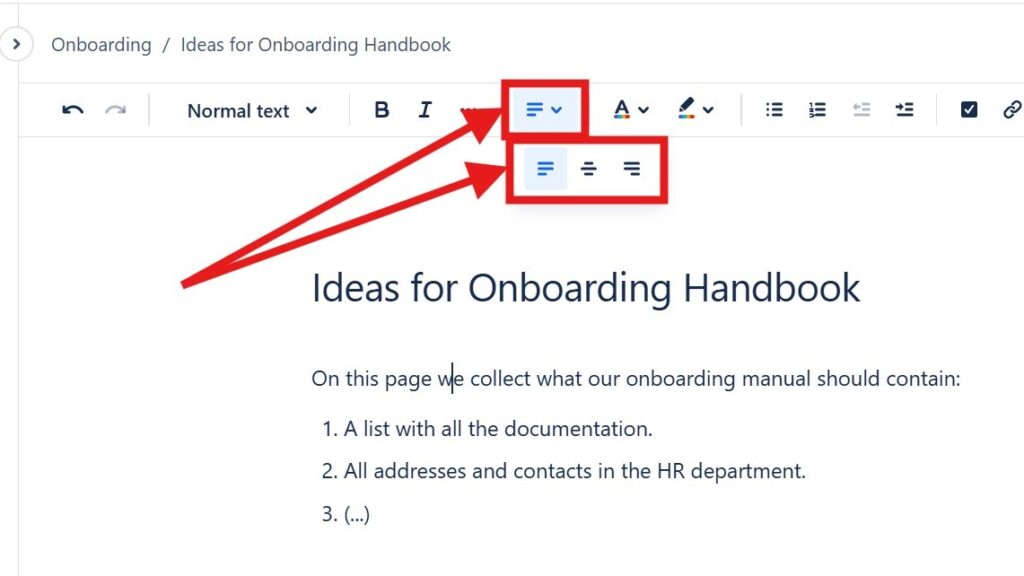
Next, I use How to Align Text in Confluence. Text alignment can improve presentation when I use tables, page layouts, or visual sections. However, I keep alignment simple because readability matters most. Text alignment should support clarity and never distract from the page content.
I also use How to Color Text in Confluence: A Quick Guide to Text Color and Highlight Color. Color can draw attention to warnings, decisions, or key messages. However, I use it carefully because too much color reduces focus. Text color works best when it highlights important information with clear purpose.
Confluence Editor and Blog Posts
After I understand basic formatting, I need a better editing workflow. I use Introducing the Confluence Editor Mode: A Seamless Experience for Teams to understand the editor experience. The editor helps me create pages, add content, and collaborate with others. The Confluence editor gives me the workspace I need to build useful pages efficiently.
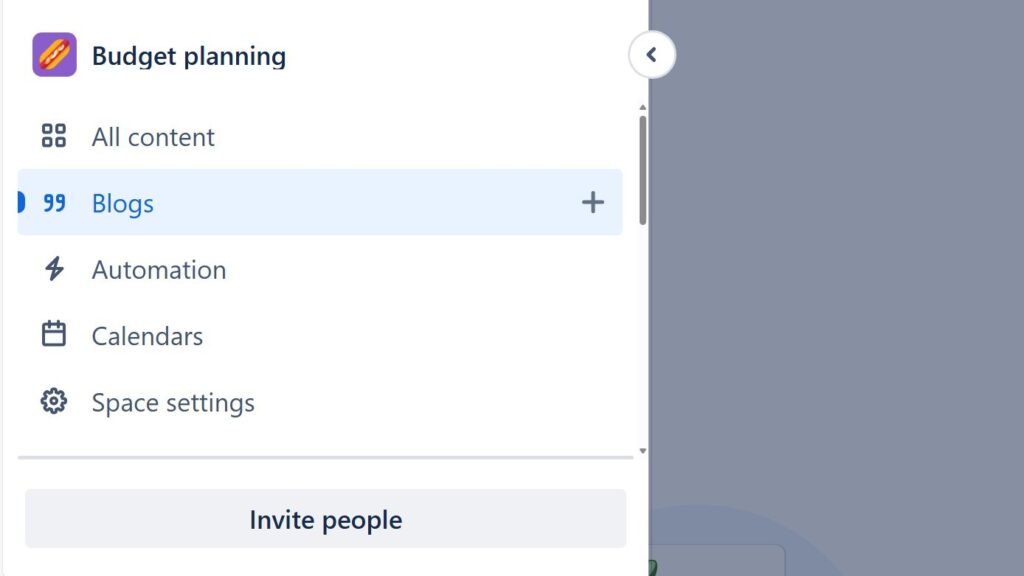
Then I use How to Create a Blog Post in Confluence: Step-by-Step Guide. Blog posts help me share updates, announcements, lessons learned, or team news. As a result, Confluence becomes more than a documentation archive. Confluence blog posts help me communicate updates in a clear and visible way.
This topic fits after page editing because blog posts use similar content skills. However, they serve a different communication purpose. Pages often store stable knowledge, while blog posts share timely information. I use pages for lasting knowledge and blog posts for updates and communication.
Tasks and Team Collaboration
Once pages and posts work, I can support teamwork more directly. I use How to Assign and Manage Tasks in Confluence (Step-by-Step Guide) to connect documentation with action. Tasks help me turn page discussions into clear responsibilities. Confluence tasks help me move from written information to concrete team action.

This topic belongs after page creation because tasks often live inside pages. For example, I can add tasks during meetings, reviews, or planning sessions. Then team members can track what they need to do. Tasks make Confluence more practical because they connect content with follow-up work.
I also connect this cluster with How I Use Confluence Optimally: A Comprehensive Guide. This article helps me combine spaces, pages, formatting, tasks, and collaboration habits. Therefore, it works well after the individual tutorials. An optimal Confluence workflow combines structure, clarity, collaboration, and regular maintenance.
Confluence in Requirements Engineering
After the general tutorials, I move into professional use cases. I use How I Use Confluence in Requirements Engineering to connect the tool with requirements work. Confluence can store requirements, decisions, meeting notes, assumptions, and validation results. Confluence supports requirements engineering when I use it with clear structure and purpose.
Requirements work needs traceability, context, and shared understanding. Therefore, I do not use Confluence as a random note collection. Instead, I use it to organize requirement discussions and decisions. A structured Confluence page can make requirements easier to review, discuss, and improve.

Then I use How to Structure a Confluence Page for Requirements Validation. This article belongs later because it builds on page structure and requirements knowledge. It helps me prepare pages for review, feedback, and quality checks. A well-structured validation page helps stakeholders check requirements more effectively.
This cluster connects tool usage with real requirements practice. In addition, it shows how Confluence supports communication between analysts, developers, testers, and stakeholders. As a result, documentation becomes part of the requirements workflow. Confluence becomes more valuable when it directly supports requirements decisions and validation.
Confluence and Jira Integration
After I understand Confluence alone, I connect it with Jira. I start with How to Create a Jira Issue in a Confluence Page. This tutorial shows how documentation can lead directly to trackable work. The Confluence and Jira connection helps me turn documented decisions into manageable work items.
This topic fits after tasks and requirements pages. For example, I can document a requirement in Confluence and create a Jira issue from it. Then the team can manage implementation or follow-up work in Jira. Confluence explains the context, while Jira helps the team track execution.
Next, I use Comparison of Confluence & Jira: A Comprehensive Guide. This article helps me compare both tools in a broader way. It shows where each tool adds value. I need both tools because Confluence and Jira solve different collaboration problems.
Suggested Learning Order for Readers
I recommend a clear learning path for Confluence tutorials. First, I learn access, purpose, dashboard navigation, and shortcuts. Then I move into spaces, pages, formatting, and editor work. This order helps me learn Confluence from simple orientation to practical team workflows.
After that, I add tasks, blog posts, and optimal usage habits. These topics help me use Confluence in daily team collaboration. Finally, I move into requirements engineering and Jira integration. Advanced Confluence use starts when I connect documentation with real work and real decisions.
This section also supports a strong link strategy. Each tutorial belongs to a clear learning cluster. Therefore, readers can move from one related article to the next. A structured Confluence tutorial path keeps readers engaged and helps them discover the next useful article.
Final Confluence Tutorial Cluster
Confluence Tutorials give me a practical path from first access to advanced collaboration. I start with simple orientation, then I build spaces and pages. After that, I improve formatting, tasks, and team workflows. Confluence becomes most powerful when I use it as a structured knowledge and collaboration platform.
In the final step, I connect Confluence with requirements engineering and Jira. This helps me document context, validate requirements, and track follow-up work. As a result, Confluence becomes part of a larger tool ecosystem. Confluence, Jira, and clear documentation habits help me manage knowledge and work more effectively.
Jira Tutorials
Jira helps me connect project structure with daily task management. I use it when teams need clear work items, transparent progress, and shared priorities. Therefore, this tutorial path starts with the reason for Jira. After that, I move from projects to issues, views, filters, and JQL. Start your Jira journey with “What is Jira?“
Why Jira Matters
Before I use a tool deeply, I want to understand its purpose. Jira can support planning, tracking, collaboration, and project control. A clear reason for using Jira helps me use it with more focus. Therefore, I start this section with the value Jira can create for teams.
I begin with Why Should I Use Jira? because it answers the basic question first. Then I continue with The Advantages of Using Jira: A Game Changer for Teams. This article shows how Jira can improve transparency, teamwork, and control. As a result, I can see Jira as more than a simple task list.
Jira also supports structured project management. Therefore, I use Exploring the Capabilities of Jira in Project Management as the next step. It helps me understand how Jira connects tasks, responsibilities, workflows, and progress. This gives me a stronger view of Jira as a project management tool.
Jira Project Foundations
After I understand the value of Jira, I need to understand projects. A Jira project gives work a clear space and structure. I use Jira projects to organize related work in one manageable environment. Therefore, project basics come before daily issue handling.
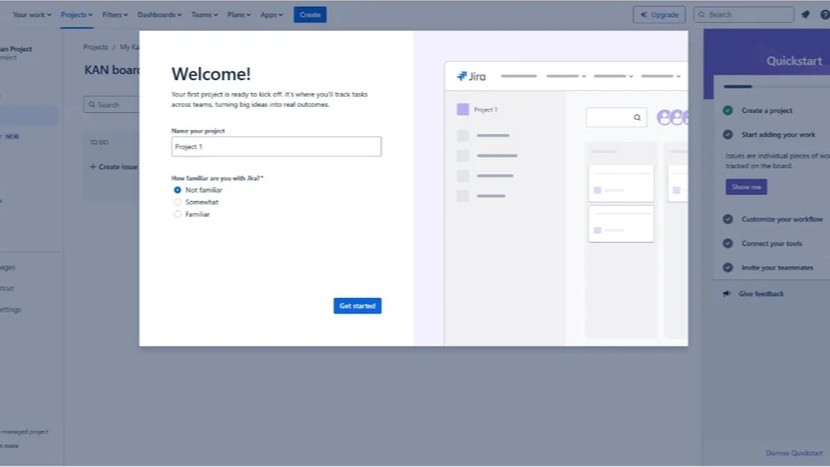
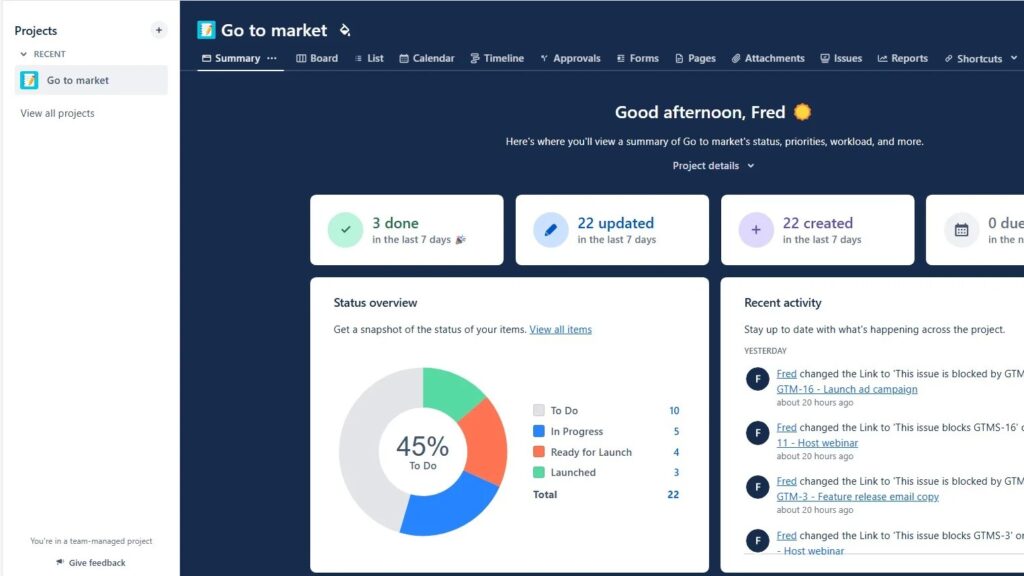
I start with Introduction to Jira Projects: Streamline Your Workflow with Ease. This article explains what a Jira project is and why it matters. Then I move to How to Create a Project in Jira. As a result, I can move from project understanding to project setup.
A good project setup helps teams work with less confusion. It gives issues a home, workflows a structure, and teams a shared view. In addition, it supports better reporting later. Therefore, I treat project creation as a core Jira skill.
Issues and Daily Work
Once I have a project, I need to understand issues. Jira issues represent tasks, bugs, stories, requests, or other work items. Issues turn project goals into concrete pieces of work. Therefore, they form the daily operating level inside Jira.
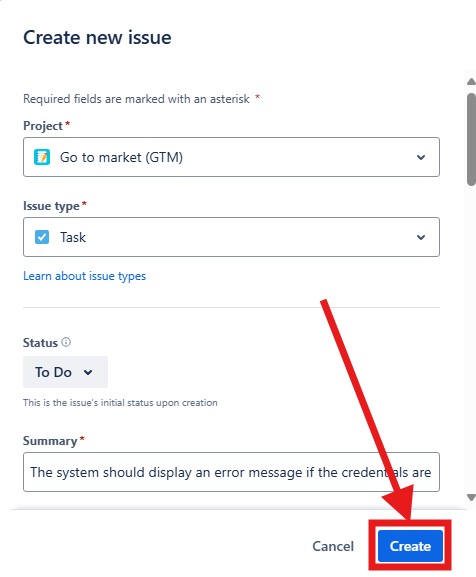
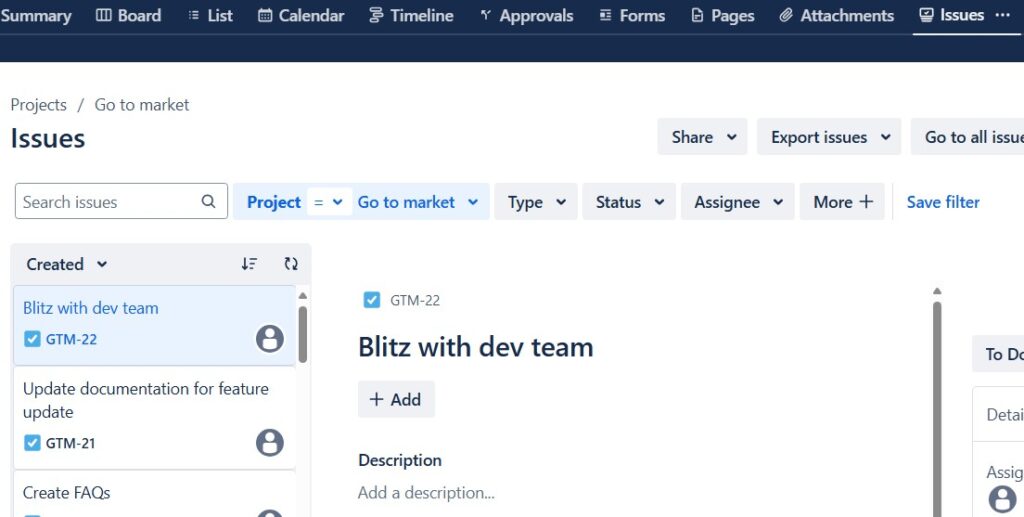
I start with Introduction to Issues in Jira because it explains the central work object. Then I use How to Create a Jira Issue: A Step-by-Step Guide. This gives me a practical workflow for creating work items. As a result, I can document work clearly and make it actionable.
Clear issues help teams avoid misunderstandings. They define what needs to happen, who owns it, and where progress stands. In addition, they support better follow-up in meetings and reviews. Therefore, issue quality directly improves team coordination.
Views, Navigation, and Productivity
After I create projects and issues, I need to work faster. Jira offers views and shortcuts that help me navigate daily work. I use Jira productivity features to reduce friction in repeated tasks. Therefore, I place navigation and views after the basic work structure.
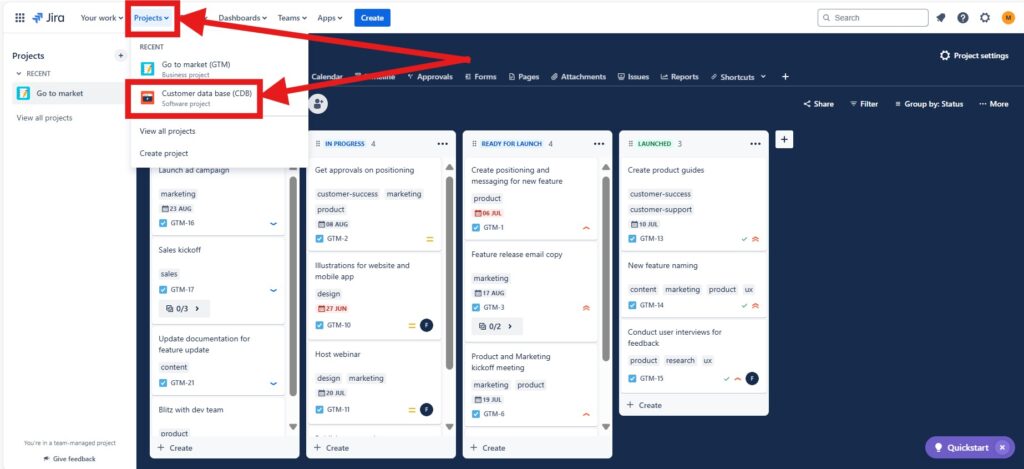
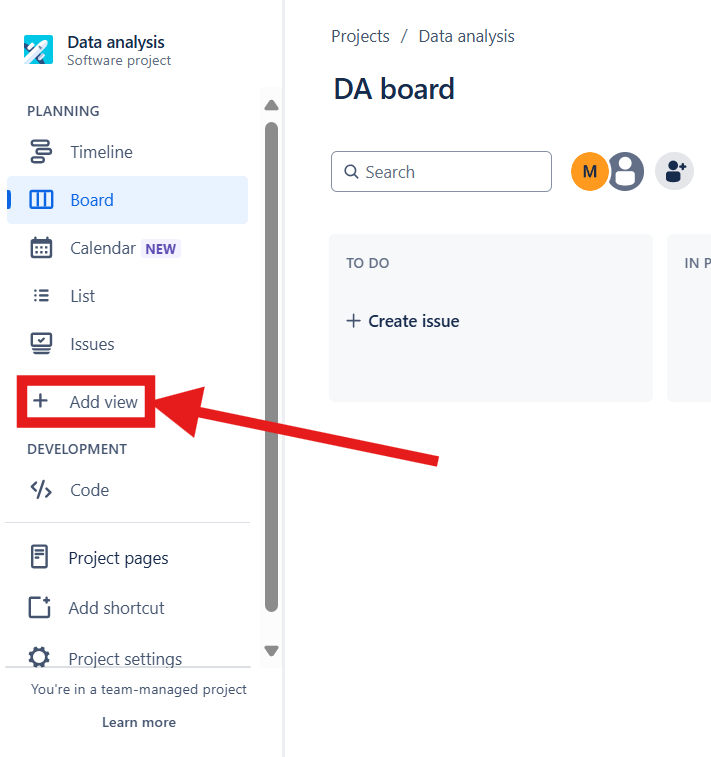
I start with How to Use Shortcuts in Jira to Boost Your Productivity. This topic helps me move faster through common actions. Then I continue with How to Create a New View in a Jira Project. As a result, I can shape Jira around the way I work.
A useful view makes work easier to scan. It helps me focus on the right issues at the right time. In addition, it can support different roles and team needs. Therefore, custom views help Jira become more practical for daily project work.
Filters and Jira Search
When a project grows, I need better search and selection. Filters help me find the issues that matter now. I use Jira filters to turn large issue sets into focused working lists. Therefore, filters come after I understand issues and views.
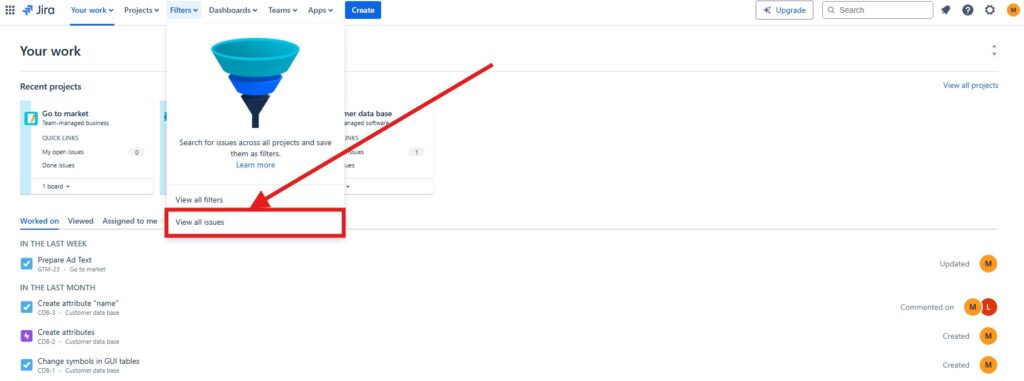
I start with How to Create a Filter in Jira: A Quick Guide. This article gives me a direct way to save useful issue searches. Then I can reuse these filters during planning, tracking, and reporting. As a result, Jira becomes easier to control as work grows.
Filters also support team transparency. They help me show open tasks, assigned work, overdue items, or specific priorities. In addition, they can support dashboards and recurring reviews. Therefore, good filters improve both personal productivity and team visibility.
Jira Query Language
After I understand basic filters, I can go deeper with JQL. Jira Query Language helps me search issues with more precision. JQL gives me stronger control over what Jira shows me. Therefore, it belongs after the basic filter tutorial.
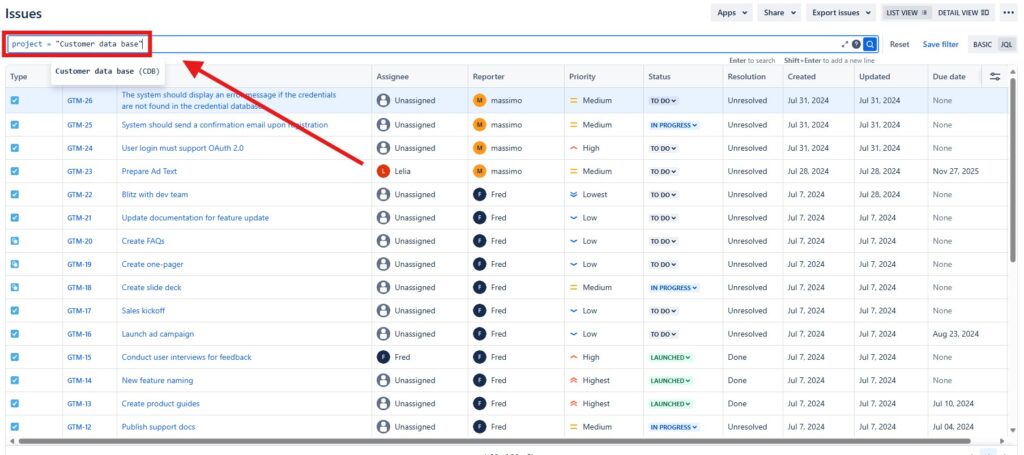
I use Introduction to JIRA Query Language (JQL) as the next advanced step. This article helps me understand structured issue searches. Then I can combine fields, operators, values, and conditions. As a result, I can create more accurate searches than simple filters allow.
JQL becomes especially useful in larger projects. It helps me find work by status, assignee, priority, sprint, label, or date. In addition, it supports reporting and analysis. Therefore, JQL helps me move from basic Jira usage to more confident Jira control.
Building a Complete Jira Workflow
All Jira tutorials connect when I use them as one learning path. First, I understand why Jira matters. Then I create projects, add issues, shape views, create filters, and use JQL. This order helps me build Jira knowledge step by step.
I do not start with complex searches before I understand the basics. Instead, I build a stable foundation first. After that, I add more powerful features. As a result, Jira becomes easier to learn, easier to explain, and easier to use.
This Jira tutorial section supports a practical tool strategy. It helps me connect project management with daily execution. It also helps me turn unclear work into visible, trackable, and manageable items. Therefore, Jira becomes a valuable tool inside a broader requirements engineering toolset.
Camunda Tutorials
I use Camunda when I want to connect process modeling with practical automation thinking. It helps me move from BPMN theory to hands-on process work. Therefore, I start with simple orientation before I build more detailed models. Camunda tutorials help me understand BPMN through practical examples and clear tool-based steps.
As a result, this section moves from basic Camunda knowledge to more elaborate BPMN topics. First, I explore the tool. Then I create projects and model simple processes. After that, I use lanes, annotations, gateways, and events to model richer behavior.
Camunda Orientation
Before I model anything, I need a clear overview of the tool. Camunda can look technical at first. However, I can understand it faster when I begin with its purpose. I start with What is Camunda? because it gives me the basic orientation.
This article helps me understand what Camunda does. It also shows why teams use it for process automation. In addition, it connects BPMN with executable process thinking. As a result, I can see where Camunda fits into requirements work.
After that, I use Getting Started with Camunda Home User Interface: Your Guide to the Basics. This topic helps me explore the Camunda starting point. I learn where important areas sit. Therefore, I can move through the interface with more confidence.
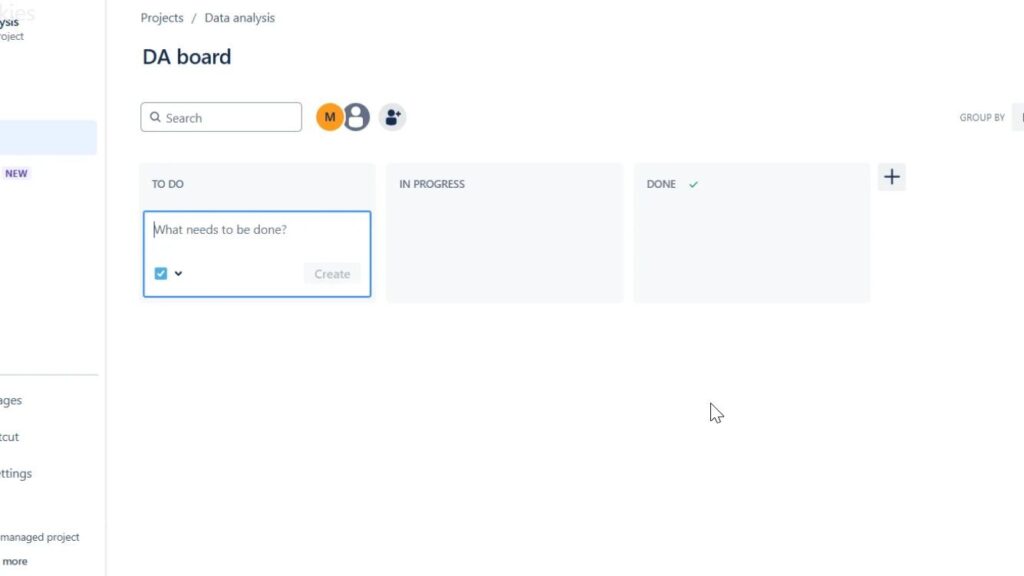
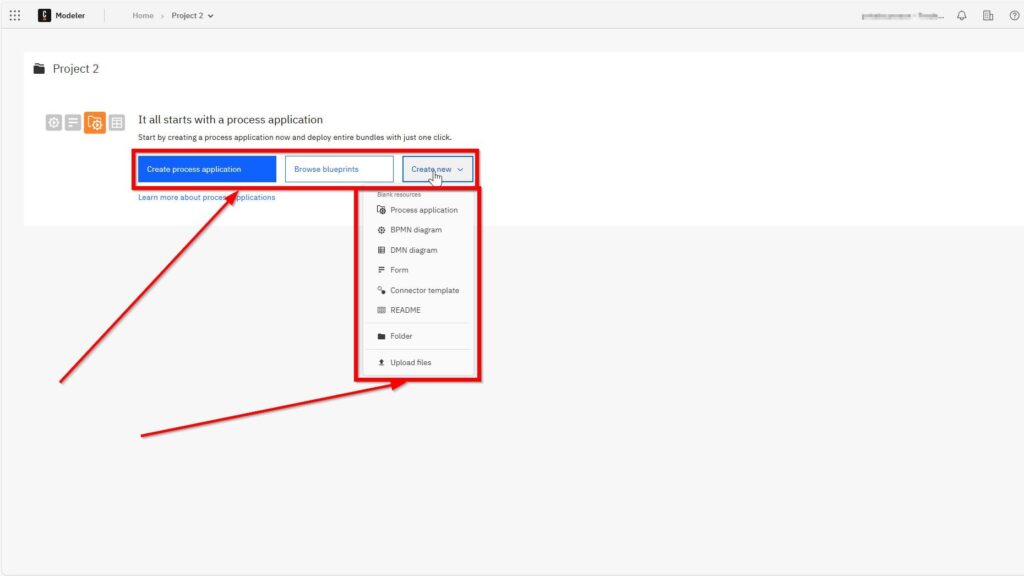
Then I continue with How to Create a New Project in Camunda. A project gives my modeling work a clear place. It also helps me organize process assets. Creating a project turns Camunda from a tool into a structured working environment.
BPMN Foundations with Camunda
After I know the tool, I need the BPMN basics. I do not want to model complex processes too early. Instead, I start with the elements that appear in almost every process. BPMN core elements give me the language for clear process modeling in Camunda.
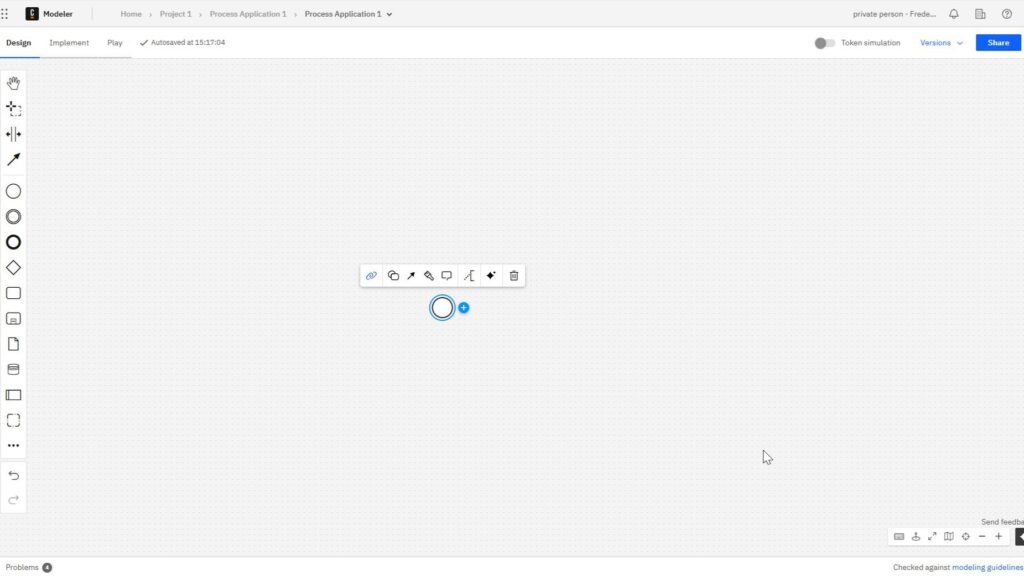
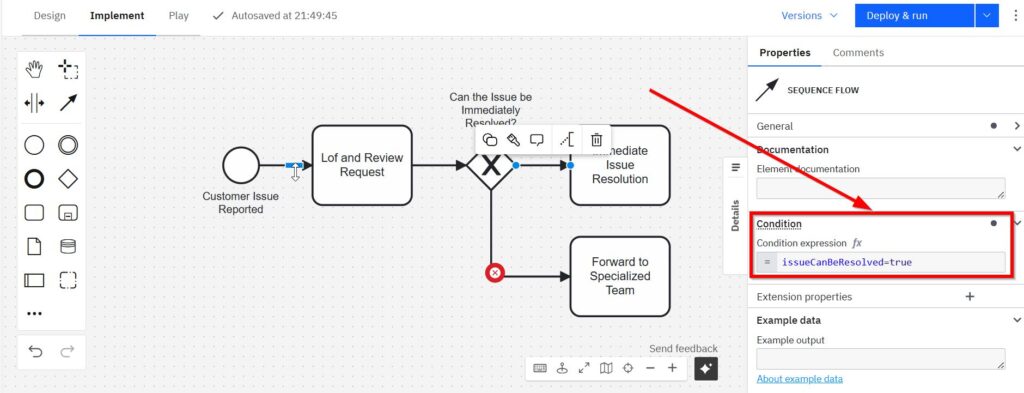
I use BPMN Core Elements with Camunda: My Hands-On Guide as my foundation. This article introduces the basic building blocks. It helps me understand events, activities, gateways, and flows. As a result, I can read and create simple BPMN diagrams.
Then I move to Engaging and Practical BPMN Example with Camunda. Examples make abstract BPMN rules easier to understand. They show how elements work together. Therefore, I can connect individual BPMN symbols with a complete process flow.
This step matters because isolated symbols do not create understanding. I need to see how a process starts, continues, branches, and ends. In addition, I need a practical scenario that stays easy to follow. A simple Camunda example helps me turn BPMN knowledge into usable modeling skill.
Process Structure and Clarity
Once I understand simple flows, I need better structure. Real processes often involve people, roles, systems, and responsibilities. Therefore, I use modeling features that make collaboration visible. Structured process models help me explain who does what inside a business process.
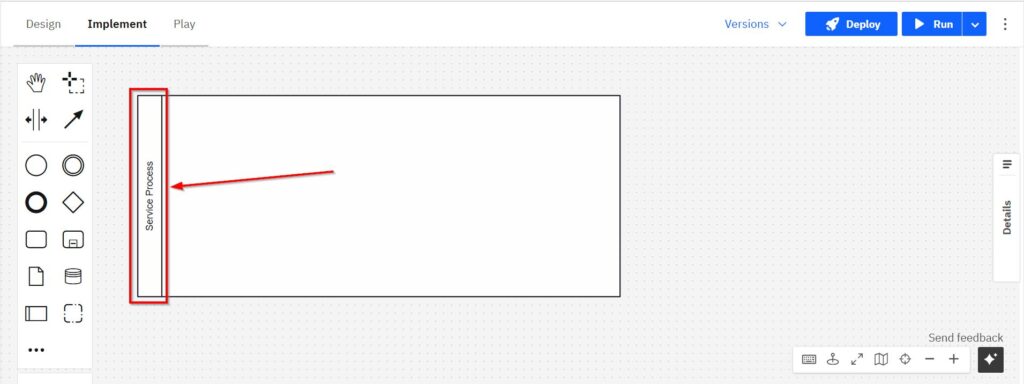
I start this cluster with BPMN Lanes in Camunda: A Step-by-Step Guide. Lanes help me separate responsibilities inside one process. They also make handovers easier to see. As a result, stakeholders can understand the process faster.
Next, I use Task Duration Annotation with Camunda: A Practical Guide. Duration annotations add helpful timing information to tasks. They do not replace the process logic. However, they make expectations and workload easier to discuss.
These two topics work well together. Lanes show responsibility, while task duration annotations show time expectations. In addition, both improve communication with stakeholders. Lanes and annotations make Camunda models clearer, more informative, and easier to review.
All Requirements Engineering Tools Articles
If you simply want to browse, explore articles on the following topics:
Jira Turorials, and