
Efficient diagram editing saves time. That is why I use the Format View in draw.io when I adjust shapes, text, colors, and connectors. In this post, I explain how to activate the Format View in draw.io. You’ll learn where to find it, why it helps, and how it makes formatting faster and easier.
What Is the Format View in draw.io?
The Format View is the formatting sidebar on the right side of the draw.io editor. I use it to change both diagram-level settings and individual objects.
The available options depend on what I am working with. For example, when I do not select an object, I can configure the diagram itself. However, when I select a shape or connector, draw.io shows formatting and arrangement options for that element.
The Format View therefore acts as a context-sensitive control panel for the current diagram or selected object.
This approach keeps many frequently used settings in one place. As a result, I spend less time moving between separate menus.
How I Activate the Format View
First, I open the View menu in the main menu bar.
Then, I select Format.
In the interface shown below, I can also use the keyboard shortcut Ctrl+Shift+P.
If the Format View is hidden, View → Format displays it again on the right side of the editor.

Once I activate the option, draw.io opens the Format panel on the right.
Using the Format View Without Selecting an Object
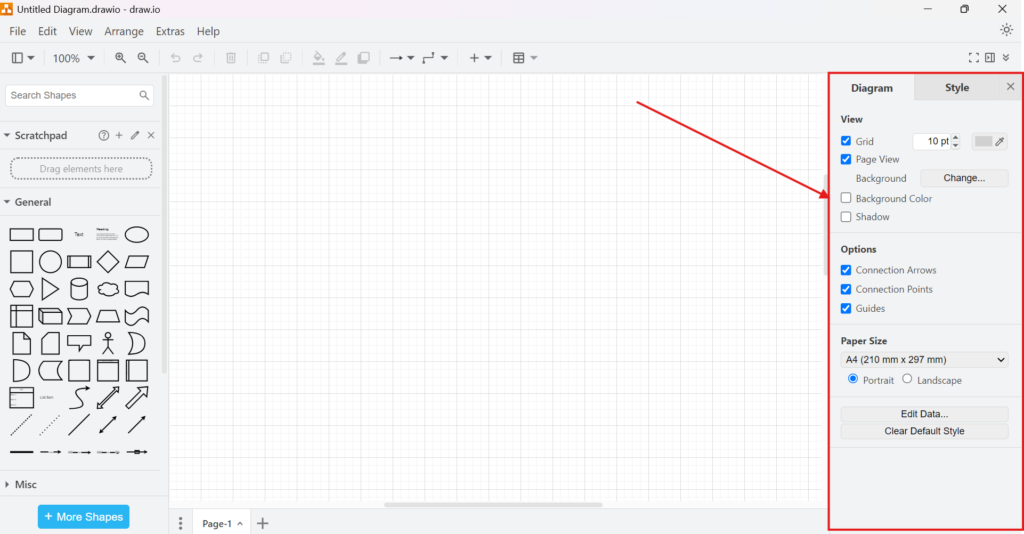
When I click an empty area of the canvas, the sidebar focuses on the diagram rather than on a specific shape.
For example, the Diagram tab gives me access to settings such as:
- grid visibility and spacing
- page view
- background settings
- connection arrows
- connection points
- guides
- paper size and orientation
Therefore, I use this view when I want to change the general working environment or page configuration.
The Style tab is also available. It lets me work with formatting options that apply to the current context.
I click an empty area of the canvas whenever I want the Format View to show diagram-level settings.
Using the Format View With a Selected Object
The Format View changes when I select a shape, connector, or another diagram element.
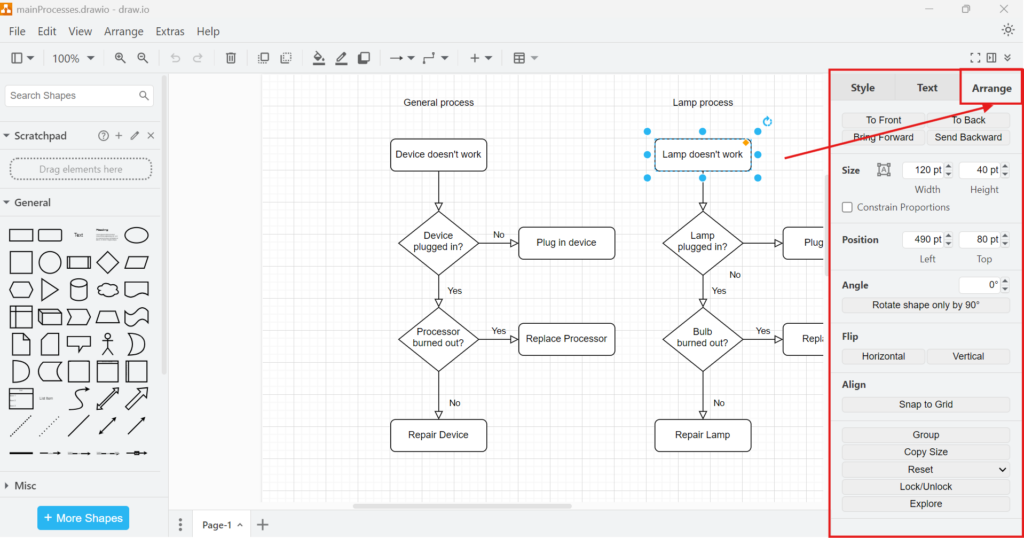
For a selected shape, I can work with tabs such as Style, Text, and Arrange. Consequently, the sidebar gives me controls that relate directly to that object.
The Style tab controls the visual appearance of the selected element. For example, I can change its fill, border, opacity, or other graphical properties.
The Text tab contains settings for labels and text formatting.
Finally, the Arrange tab focuses on geometry and structure.
What I Can Do in the Arrange Tab
I use Arrange when I need precise control over an object’s position or relationship to other objects.
Depending on the selected element, I can use options for:
- moving an object to the front or back
- changing its width and height
- setting its horizontal and vertical position
- rotating it
- flipping it horizontally or vertically
- aligning objects
- grouping elements
- locking or unlocking an object
Therefore, I find this tab especially useful when I clean up larger diagrams.
The Arrange tab helps me control where an element sits, how large it is, and how it relates to surrounding objects.
Why I Keep the Format View Open
I usually keep the Format View visible while I build or refine a diagram. It gives me immediate access to the settings I use most often.
However, the main advantage is not simply speed. The panel also makes the editing context clearer.
When I click the canvas, I work with diagram settings. When I select an element, I work with that element. Therefore, I can quickly understand which settings my changes will affect.
This becomes particularly useful in complex diagrams with many shapes and connectors.
The Format View reduces unnecessary navigation and gives me a consistent place for diagram, style, text, and arrangement controls.
Conclusion
Activating the Format View in draw.io takes only a few seconds. I open View and select Format, or I use the displayed keyboard shortcut.
After that, the sidebar adapts to my current selection. I can configure the diagram itself, format individual elements, edit text, or arrange objects precisely.
For that reason, I consider the Format View one of the most useful parts of the draw.io interface. It gives me direct access to the controls I need while keeping the diagram itself in focus.
What’s Next?
Now that I know how to activate the Format View in draw.io, I can continue with the shapes view. Formatting helps me adjust selected elements, but the shapes view helps me find the right building blocks for my diagram. In the next article, I’ll explain How to activate the “Shapes” view in draw.io. You’ll learn how to open the shapes panel, browse available shape libraries, and add useful elements to your canvas. Click below to continue and build diagrams in draw.io with more control.
Create a Stronger Workflow with Requirements Engineering Tools
Requirements engineering becomes clearer when I use tools that support every important step. Therefore, I use draw.io to create visual models, Confluence to document knowledge, Jira to manage requirements-related work, and Camunda to model business processes. Each tool helps me reduce complexity and improve collaboration. As a result, I can connect ideas, decisions, tasks, and workflows in one practical tool landscape. In the main article on Requirements Engineering Tools, I show how these tools work together and help me build better requirements from start to finish.