
Confluence helps me create clear documentation, but page structure matters. When I change headings in confluence, I make content easier to scan, read, and understand. Good headings guide readers through each section and improve the page flow. In this guide, I show you simple steps to adjust heading levels and create cleaner, more professional Confluence pages.
Why I Use Headings in Confluence
Headings divide a page into logical sections. Therefore, they help readers understand both the content and its structure.
I use higher heading levels for broader topics and lower levels for information that belongs underneath them.
A clear heading hierarchy shows how sections relate to each other and makes longer pages easier to understand.
For this reason, I choose heading levels according to meaning rather than appearance.
Step 1: Open the Page Editor
First, I open the Confluence page that I want to change.
Then I select the Edit button at the top of the page. Confluence opens the editor so I can modify the content.

Step 2: Select the Text and Open the Style Menu
Next, I select the text that I want to turn into a heading.
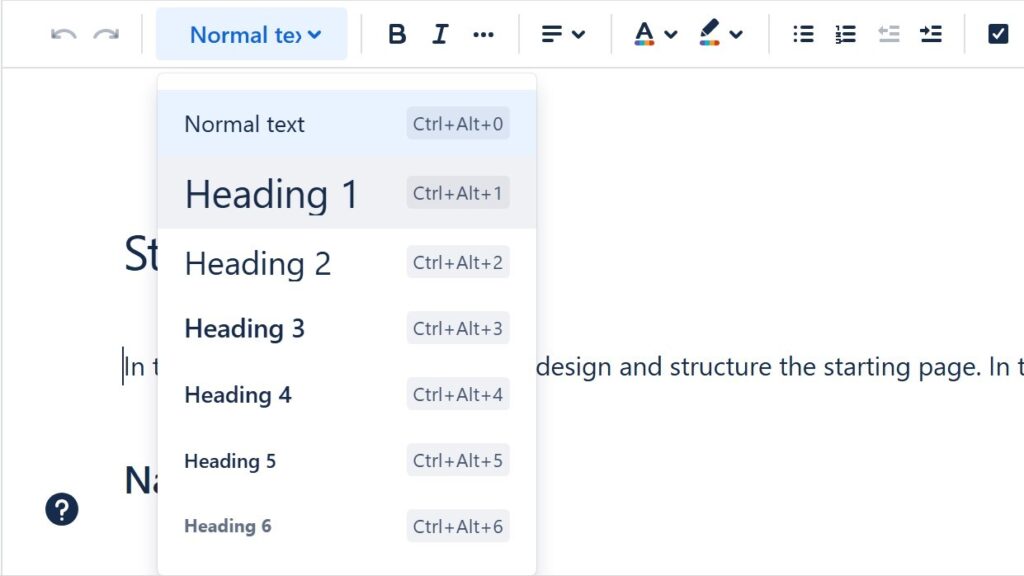
Then I open the text-style menu in the editor toolbar. The menu shows Normal text and the available heading levels.

The text-style menu lets me assign a structural role to the selected text.
Step 3: Choose the Heading Level
Now I select the heading level that matches the structure of the page.
For example, I use a higher level for an important section and a lower level for a subsection beneath it.
In the example, I select Heading 2.

I avoid skipping levels without a structural reason. Therefore, I build the page hierarchy consistently.
Step 4: Review the Heading in the Editor
Confluence immediately applies the selected heading style.
I review the result and check whether the heading sits at the correct level in relation to the surrounding content.

I use heading levels to communicate structure, not simply to make text larger.
Step 5: Update the Page
Finally, I select Update to publish the change.
Confluence then displays the heading on the published page.

How I Structure Headings
For most pages, I keep the hierarchy simple.
I use the main page title for the overall subject. Then I use headings for major sections and lower heading levels for subsections.
For example:
- Heading 1: major top-level section
- Heading 2: section within that topic
- Heading 3: subsection
- lower levels: additional detail when necessary
However, I avoid creating unnecessary levels on short pages.
A simple and consistent heading hierarchy usually improves readability more than complex formatting.
Conclusion
Changing headings in Confluence takes only a few steps.
I open the editor, select the text, choose the correct heading level, review the result, and update the page.
Well-structured headings make Confluence pages easier to scan, navigate, and understand.
Therefore, I treat headings as part of the information structure rather than as decorative formatting.
What’s Next?!
Now that you know how to change headings in Confluence, your pages already have a clearer structure. However, headings are only one part of readable documentation. I also need clean formatting to make text easier to understand.
In the next article, I’ll show you How to Format Text in Confluence. You’ll learn how formatting helps you highlight key information, improve readability, and guide readers through your content. Click the next article to make your Confluence pages clearer and more professional.
Strengthen Requirements Engineering with Practical Tools
Requirements engineering becomes easier when I use tools that support clear analysis, documentation, tracking, and process work. In my main article on Requirements Engineering Tools, I explain how draw.io, Confluence, Jira, and Camunda fit into a practical workflow. Draw.io helps me visualize ideas. Confluence helps me document knowledge. Jira helps me manage tasks and issues. Camunda helps me model processes. Click through to the full article and learn how these tools help you create better requirements.