
Tool links help me connect diagrams with daily documentation work. I often use Notion and draw.io together because it keeps visual content easy to access. In this guide, I explain How use links to Notion draw.io diagrams. You’ll learn how links improve collaboration, support clarity, and make diagrams easier to find across your workflow.
What Is a Notion Link in draw.io?
draw.io includes a dedicated Notion option under its embed functions. However, it does not transfer the diagram into a native Notion diagram format.
Instead, draw.io generates a URL that opens the diagram through the diagrams.net viewer. I can then use this URL in Notion.
Therefore, I keep two things separate:
- My original draw.io file remains the source that I edit.
- The generated URL provides access to the diagram through a browser.
The Notion link gives me a convenient way to present a draw.io diagram without exporting and uploading a separate image.
This distinction also matters when I update the diagram. The generated URL in this workflow contains diagram information. Therefore, I treat it as a representation of the diagram at the time I create the link. If I make important changes later, I generate a new link and replace the old one.
Step 1: Open the Notion Embed Function
First, I open the diagram that I want to share.
Then, I select:
File > Embed > Notion
draw.io now opens the settings for the Notion link.Go to the menu and click File > Embed > Notion. This opens up the embed configuration settings.

Step 2: Configure the Notion Link
Next, I review the available settings before I create the link.
The dialog gives me several options.
Link handling
The Links setting controls how links inside the diagram behave. In most cases, I leave this set to Automatic unless I need specific behavior.
Border color
I can also define a border color for the diagram viewer. This setting changes the presentation rather than the diagram itself.
Editing
The Edit option determines what happens when someone wants to work with the diagram.
For example, I can select Make a Copy. In that case, the recipient works with a copy instead of changing my original diagram.
I prefer Make a Copy when I want to share a diagram without giving other people direct control over my source file.
Layers
If my diagram uses layers, I can include them in the generated viewer configuration. This can be useful for larger diagrams in which I separate different types of information.
Tags
Likewise, I can include tags if I use them to organize diagram elements.
For a simple flowchart, I normally keep the configuration straightforward. However, these settings become more useful as the diagram becomes more complex.
When the configuration is complete, I select Create.

Step 3: Copy the Generated Link
draw.io now creates the link and displays it in a separate window.
The URL can be very long. That is normal because the link can contain information required to display the diagram.
I do not need to select or edit the URL manually. Instead, I select Copy.
I copy the complete generated URL because changing or shortening its encoded content can prevent the diagram from loading correctly.

Step 4: Confirm That draw.io Copied the Link
After I select Copy, draw.io confirms that it placed the URL on the clipboard.
I select OK and continue.
This step is simple, but the confirmation helps me verify that I can now paste the complete link into another application.

Step 5: Paste the Link into Notion
Finally, I open the Notion page where I want to reference the diagram and paste the copied URL.
Depending on how I want to structure the page, I can use the link as a normal reference or use Notion’s available embedding options to present external content more directly.
Before I publish or share the page, I test the URL myself.
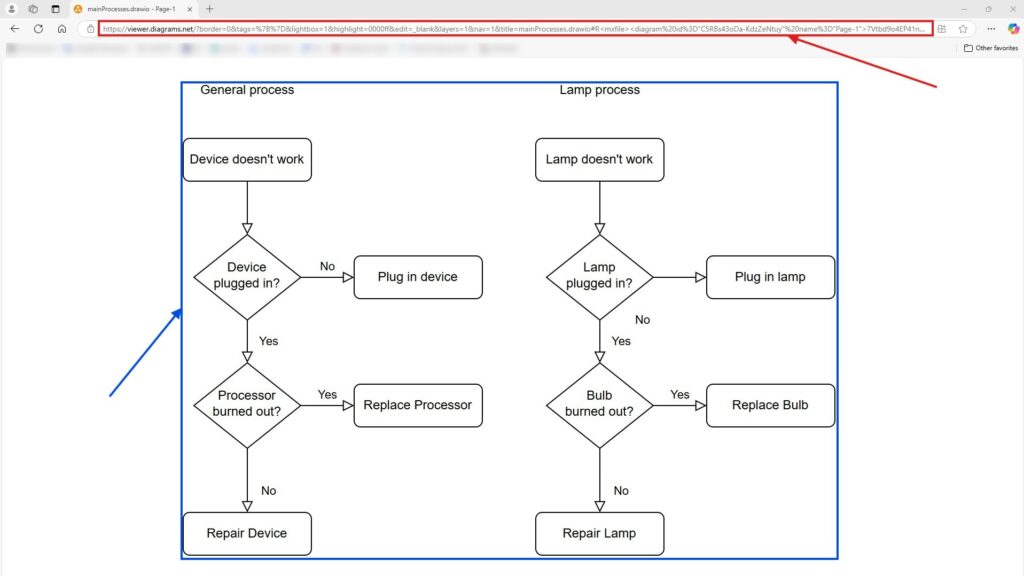
The generated link should open the diagram in the diagrams.net viewer. In my example, the browser displays the complete troubleshooting flowchart inside a viewer frame.

What Happens When I Change the Original Diagram?
This point is important.
I do not assume that the generated Notion link automatically follows every later change to my original draw.io file.
In the workflow shown here, the URL contains diagram data. Therefore, I treat the generated link as a link to the diagram state that I created at that moment.
If I later change the source diagram substantially, I:
- Save the updated draw.io file.
- Create a new Notion link.
- Copy the new URL.
- Replace the previous link in Notion.
This approach prevents me from confusing a generated viewer link with a permanently synchronized reference to my editable source file.
When I Use This Method
I find this method useful when a diagram belongs directly to documentation.
For example, I can use it for:
- process diagrams,
- system overviews,
- architecture diagrams,
- workflows,
- decision diagrams,
- requirements models,
- project documentation.
The main advantage is simplicity. I can connect a visual model with the page that explains it without first converting the diagram into an image.
At the same time, I still keep the original draw.io file as my authoritative source.
What I Check Before Sharing the Link
Because the generated URL can carry diagram information, I consider its contents before sharing it broadly.
For internal or sensitive diagrams, I first check whether this type of URL-based sharing fits my security and confidentiality requirements.
I also test the link from the perspective of the recipient. This helps me verify that the diagram opens as expected and that the editing behavior matches my intention.
I treat the original draw.io file as the editable source and the Notion link as a convenient presentation and sharing mechanism.
Conclusion
Creating links to Notion draw.io diagrams only requires a few steps. I open File > Embed > Notion, configure the viewer options, create the link and copy it. Then, I paste the URL into the relevant Notion page.
The important part is understanding what I am sharing. The link gives me direct browser access to the diagram, while my
What’s Next?
Now that I know how to use links to Notion draw.io diagrams, I can make my diagram workflow even more reusable. Links help me access diagrams quickly, but libraries help me store and reuse custom shapes. In the next article, I’ll explain How to Create a Library in Draw.io. You’ll learn how libraries support consistency, save time, and make repeated diagram work much easier. Click below to continue and create your first draw.io library.
Build Better Requirements Work with Connected Tools
Requirements engineering becomes clearer when I use tools that support visual thinking, documentation, coordination, and process modeling. Therefore, I use draw.io to create diagrams, Confluence to organize knowledge, Jira to manage requirements-related work, and Camunda to model business processes. Each tool helps me handle complexity in a practical way. As a result, I can connect ideas, decisions, tasks, and workflows more effectively. In the main article on Requirements Engineering Tools, I show how these tools work together and support a stronger requirements engineering workflow.