
A clear view helps me work better in draw.io. Sometimes I need to inspect small details. At other times, I need the full diagram overview. In this article, I explain how to zoom in and zoom out in draw.io. You’ll learn how zoom helps you review diagrams, flowcharts, and mind maps faster and with more control.
What Zoom Does in draw.io
Zoom controls how large the diagram appears on my screen in draw.io. It does not resize shapes, connectors, text, or pages.
When I zoom in, I can inspect small details more easily. For example, I can check connector positions, labels, or alignment.
When I zoom out, I can see more of the diagram at once. Therefore, I often use a lower zoom level when I review the overall structure.
Zoom changes only my view of the diagram. It does not change the diagram itself.
Zoom In and Zoom Out from the View Menu
The View menu gives me direct access to the basic zoom commands.
I open View in the main menu. Near the bottom, I can select Zoom In or Zoom Out. draw.io also displays the available keyboard or mouse shortcuts next to these commands.
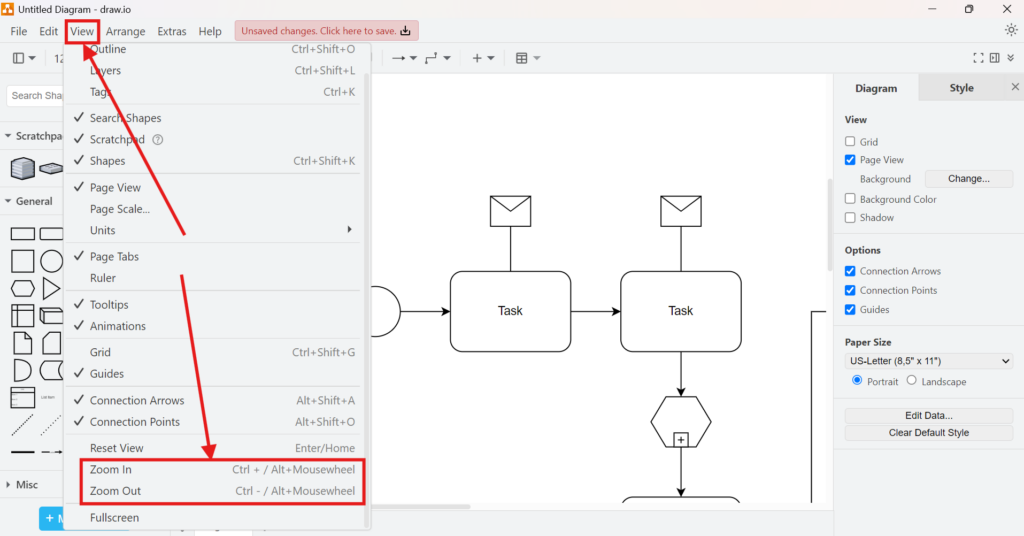
This method is useful when I do not remember a shortcut. In addition, it makes the available commands easy to find.
However, I usually use another method when I want to choose an exact zoom level.
Select a Zoom Level from the Toolbar
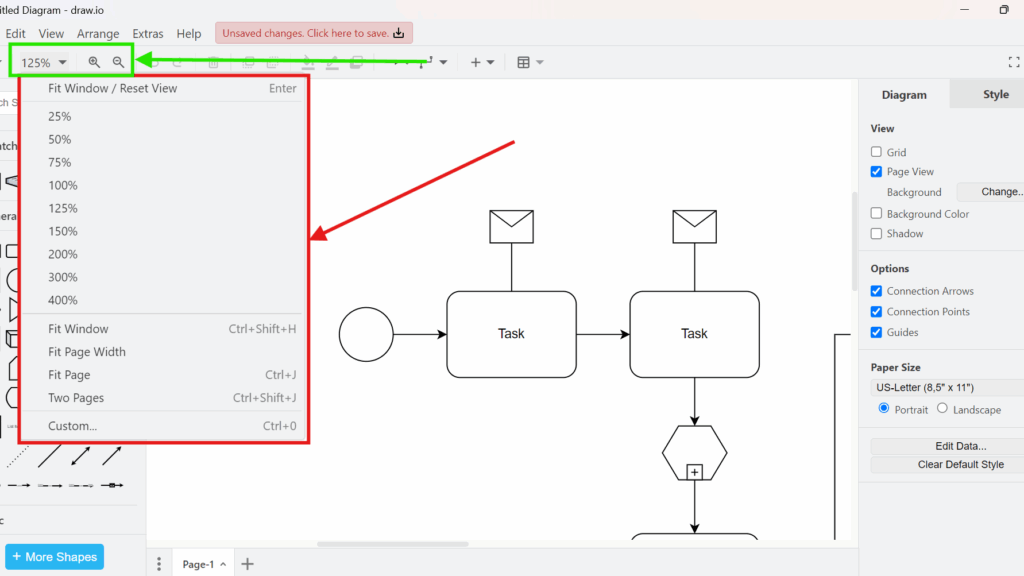
The toolbar provides more control. I can click the current zoom percentage to open the zoom menu.
For example, I can select predefined values such as 25%, 50%, 75%, 100%, 125%, 150%, 200%, 300%, or 400%.

This option is useful when I need to control the zoom level precisely.
This approach is especially useful when I want a predictable view. For example, I can return to 100% instead of adjusting the scale several times.
I use a specific percentage when I want consistent zoom levels during editing or review.
Use Fit Window and Other Fitting Options
The same zoom menu contains several options that automatically adjust the view.
Fit Window scales the diagram so that the relevant content fits inside the available workspace. Depending on the current draw.io version and layout, I can also find options such as Fit Page Width, Fit Page, or Two Pages.
These commands solve a different problem than normal zooming. Instead of choosing a percentage, I let draw.io calculate a useful scale.
Therefore, I use them when I lose orientation after moving around a large diagram.
Use Keyboard and Mouse Shortcuts
For repeated zooming, shortcuts can save time. draw.io displays the currently available shortcuts directly beside the Zoom In and Zoom Out commands.
I prefer checking these labels because the exact shortcut can depend on the operating system, browser, or draw.io environment.
Mouse-wheel zoom is particularly useful when I move between detailed work and an overview. I can change the scale without opening a menu.
For reliable shortcut information, I use the shortcut shown directly in my current draw.io interface.
When I Zoom In
I normally zoom in when I need to work precisely.
Typical examples include:
- positioning connectors
- checking connection points
- editing small labels
- aligning nearby shapes
- reviewing crowded sections
- inspecting details in large process or architecture diagrams
However, staying too close to the diagram can hide structural problems. Therefore, I regularly zoom out again after detailed editing.
When I Zoom Out
I zoom out when I want to evaluate the diagram as a whole.
This helps me check whether the visual hierarchy still works. I can also see whether important elements sit too far apart or whether one section dominates the page.
In addition, zooming out makes disconnected elements easier to notice.
I use zoomed-in views for precision and zoomed-out views for structure.
Zooming Versus Resizing
It is important to separate these two actions.
Zooming changes what I see on screen. Resizing changes the actual dimensions of a shape, image, text box, or other diagram element.
Therefore, changing the zoom level does not affect the exported diagram. It also does not alter connector lengths, object sizes, or page dimensions.
This distinction matters when I prepare diagrams for documentation or presentation.
A Simple Workflow
My usual workflow is straightforward. I start with an overview of the diagram. Then I zoom in when I need to edit a specific area. Afterward, I zoom out again to check the result in context.
If I lose orientation, I use a fitting option such as Fit Window instead of manually adjusting the zoom several times.
The most effective zoom level is the one that matches the task I am performing.
Conclusion
Zooming in draw.io is a navigation tool rather than a formatting tool. I can control it through the View menu, the toolbar, fitting commands, or shortcuts.
For detailed editing, I zoom in. For structural review, I zoom out. When I need a defined scale, I select a percentage. Finally, when I lose the overall view, I use one of the automatic fitting options.
This simple distinction makes large diagrams easier to edit, review, and understand.
What’s Next?
Now that I know how to zoom in and zoom out in draw.io, I can move between details and the full diagram view more easily. However, sometimes the workspace still feels confusing after many zoom and navigation changes. That is why resetting the view helps. In the next article, I’ll explain How to Reset the View in draw.io – Mastering View Control. You’ll learn how to return to a clear workspace and regain orientation in your diagram faster. Click below to continue and control your draw.io view with more confidence.
Create a Clearer Requirements Workflow with Tools
Requirements engineering becomes easier when I use tools that support visual thinking, documentation, coordination, and process modeling. Therefore, I use draw.io to create diagrams, Confluence to organize knowledge, Jira to manage requirements-related work, and Camunda to model business processes. Each tool helps me structure a different part of the workflow. As a result, I can connect ideas, decisions, tasks, and processes more clearly. In the main article on Requirements Engineering Tools, I show how these tools work together and support better requirements work from start to finish.