
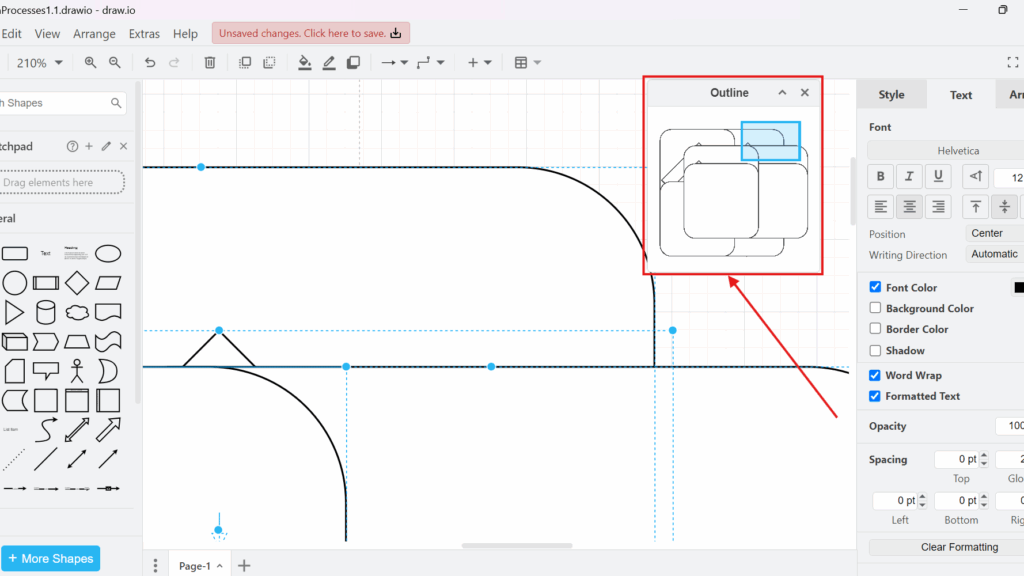
Large diagrams can become hard to navigate in draw.io. Scrolling and zooming take time when I need a quick overview. Therefore, I use the Outline View. In this post, I explain how to activate the Outline View in draw.io. You’ll learn how it helps you see the whole diagram, jump to sections faster, and work more efficiently.
What Is the Outline View in draw.io?
The Outline View in draw.io is a small navigation window that shows a simplified overview of my entire diagram. Meanwhile, I can keep the main canvas at the zoom level I need for editing.
The Outline also indicates which part of the diagram I currently see on the canvas. Therefore, I can understand my position without repeatedly zooming out.
The Outline View separates navigation from editing: I keep the detail I need on the canvas while retaining an overview of the complete diagram.
This becomes increasingly useful as a diagram grows. For example, I often work with process models that contain several areas, participants, or groups of elements. At a high zoom level, only a small part of such a model remains visible. The Outline gives me the missing spatial context.
How I Activate the Outline View
First, I open the View menu in the draw.io menu bar. Then, I select Outline.
Alternatively, I use the keyboard shortcut Ctrl+Shift+O.
I can activate the Outline View through View > Outline or with Ctrl+Shift+O.

After I activate the option, draw.io opens the Outline as a small floating panel on the canvas. I do not have to change the zoom level or leave the section I am editing.
How I Read the Outline
The Outline represents the structure of my complete diagram in a reduced form. Shapes and larger diagram areas remain recognizable, although the panel does not show every detail at full size.
More importantly, the highlighted area inside the Outline represents the section that I currently see on the main canvas.

This relationship between the main canvas and the Outline makes navigation easier to understand. If I zoom into one section, I still know where that section sits within the complete model.
The highlighted viewport tells me where my current canvas view is located within the overall diagram.
Therefore, the Outline works like a miniature navigation map rather than a second editing canvas.
How I Navigate with the Outline View
When I move to another part of the diagram, the highlighted area in the Outline changes accordingly. As a result, I receive immediate visual feedback about my new position.

I can also use the Outline itself to move through a large diagram. Instead of repeatedly scrolling across the canvas, I navigate through the miniature overview and move directly toward the area I need.
This is particularly useful when I work at a high zoom level. At that level, normal scrolling can become inefficient because I can see only a small section of the complete model.
For large diagrams, the Outline gives me a faster way to change location without sacrificing my working zoom level.
When I Find the Outline View Most Useful
I do not need the Outline for every diagram. A small flowchart may already fit comfortably on the screen. In that case, the additional panel offers little benefit.
However, I normally activate it when the diagram extends far beyond the visible canvas. For example, I find it useful for:
- large BPMN process models with several participants or process areas;
- UML or architecture diagrams with many connected components;
- system landscapes that extend horizontally or vertically;
- diagrams where I frequently move between distant sections;
- detailed models that I edit at a high zoom level.
In addition, the Outline helps when I lose my position after zooming or scrolling. Instead of zooming out simply to regain orientation, I can check the miniature overview.
Outline View vs. Zooming Out
I can also obtain an overview by zooming out. However, these two approaches serve different purposes.
When I zoom out, I reduce the size of everything on the main canvas. That helps me inspect the complete model, but it also makes labels and individual elements harder to edit.
The Outline solves a different problem. It keeps the overview separate from my working area.
I use zooming when I want to inspect the diagram itself at a different scale, whereas I use the Outline when I want orientation without changing my editing scale.
Therefore, I often keep the canvas zoomed in and use the Outline for navigation.
Closing the Outline View
When I no longer need the panel, I close it with the X in its upper-right corner. Alternatively, I can return to the View menu and disable Outline.
This makes the feature easy to use temporarily. For example, I can activate it while restructuring a large diagram and close it again when I return to detailed work in a single area.
Final Thoughts
The Outline View in draw.io solves a simple but important navigation problem. Large diagrams often require me to choose between seeing enough detail and understanding where I am in the overall model. The Outline lets me do both.
I use the Outline View whenever a diagram becomes too large to navigate comfortably at my preferred zoom level.
It gives me a compact overview, shows my current position, and helps me move between distant areas more efficiently. Therefore, it is especially valuable for large process models, architecture diagrams, and other diagrams that extend well beyond the visible canvas.
What’s Next?
Now that I know how to activate the Outline View in draw.io, I can navigate large diagrams more easily. However, complex diagrams also need clear structure inside the canvas. That is where layers help. In the next article, I’ll explain How to Use Layers in draw.io. You’ll learn how layers separate diagram content, improve organization, and make complex diagrams easier to manage. Click below to continue and structure your draw.io diagrams with more control.
Use Requirements Engineering Tools with More Clarity
Requirements engineering becomes more effective when I use tools that support visual thinking, documentation, task management, and process modeling. Therefore, I use draw.io to create diagrams, Confluence to organize knowledge, Jira to manage requirements-related work, and Camunda to model business processes. Each tool helps me structure complex work in a practical way. As a result, I can connect ideas, decisions, tasks, and workflows more clearly. In the main article on Requirements Engineering Tools, I show how these tools work together and help me build a stronger requirements workflow.