Sometimes, timing is everything in a process. Especially when I wait for multiple signals before continuing. That’s when modeling intermediate events in BPMN 2.0 becomes essential. In this article, I’ll show you how to capture multiple events correctly—without running into dead ends or lost signals.
What is BPMN 2.0?
BPMN 2.0 stands for Business Process Model and Notation, version 2.0. It’s the official standard that lets me create clear and structured process diagrams. These diagrams help everyone—from analysts to developers—understand what’s going on.
Because BPMN follows a common visual language, I can use it to bridge the gap between business and IT. As a result, communication improves, errors decrease, and automation becomes easier.
Mor about BPMN 2.0 in BPMN Core Elements and Process vs. Algorithm – What’s the Difference? (open in new tabs).
Events in BPMN 2.0
Events are things that happen. That’s the simplest way to say it. In BPMN, events can start a process, pause it, or end it. They can also wait for conditions—like a timer, a message, or a signal.
Today, I focus on intermediate events. These events occur between the start and end of a process. They are crucial when I need to wait for external input.
However, I must model them correctly. Otherwise, the process will miss the signals completely.
The Common Mistake with Intermediate Events
Let’s say I have the following flow:
- Task A
- Event 1
- Event 2
- Task B
You might think placing both events in sequence works fine. But it doesn’t. And here’s why.
In BPMN 2.0, intermediate catch events are transient. If Event 2 happens before the process reaches it, the event is lost. Gone. The process was not listening, so the signal vanished.
This concept is called strict vanishing semantics. I must actively wait for an event when it happens. Otherwise, I’ll miss it entirely.
That’s why placing two catch events in a row doesn’t guarantee success.
So what does?
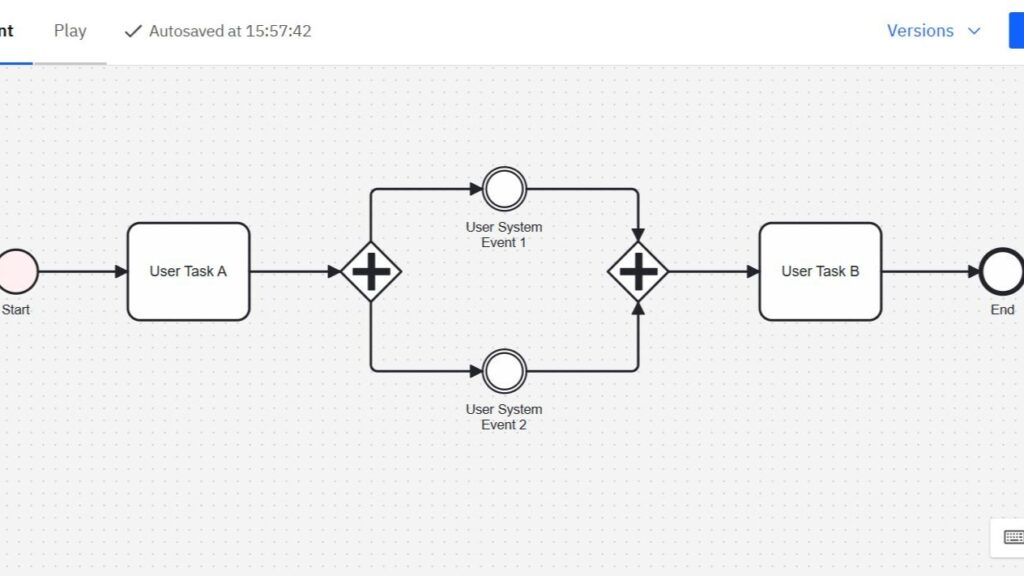
The Solution: Catch Events in Parallel
I use a parallel gateway to model this correctly. This approach guarantees that both events are caught—no matter which comes first.
Let’s walk through the correct modeling pattern, step by step.
Step-by-Step: Model Multiple Intermediate Events in BPMN
1. Start with Task A
Every process begins somewhere. Here, I use Task A as the initial step. It could be a user action, a service task, or any activity that needs to happen first.
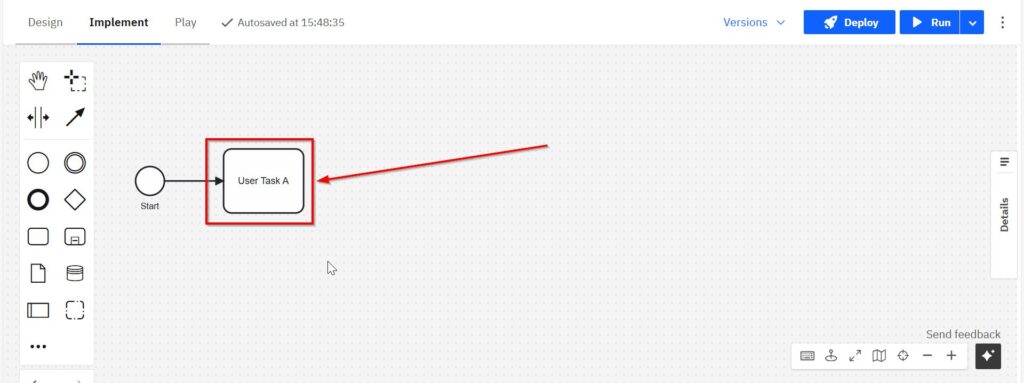
From Task A, I connect the flow to the next step using a regular sequence flow.
2. Insert a Parallel Gateway (AND-split)
Next, I place a parallel gateway right after Task A. This gateway splits the flow into two paths.
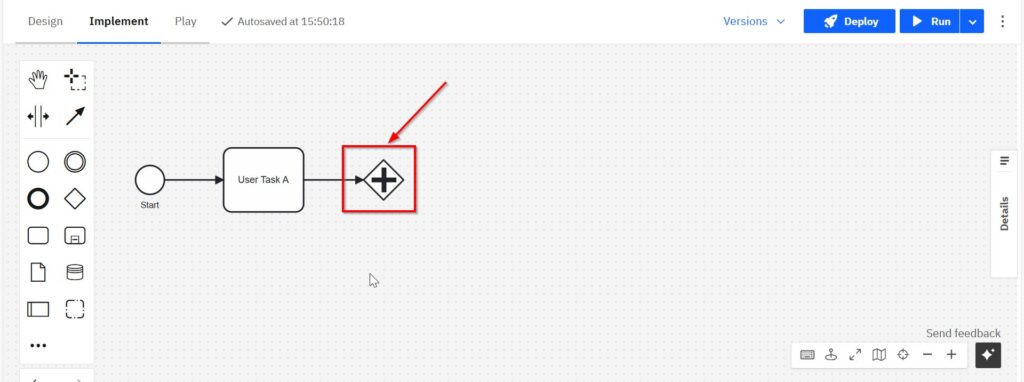
Why do I do this?
Because I want each path to wait for one event separately. This way, I listen for both at the same time.
3. Add Intermediate Catch Events
On each of the two branches, I place an intermediate catch event.
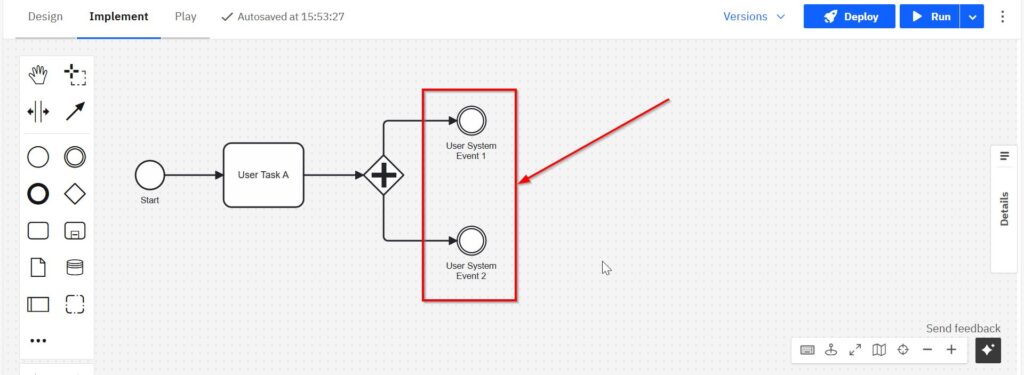
- One waits for Event 1
- The other waits for Event 2
These events could be message events or signal events, depending on the use case.
What matters is this: the process now listens for both events independently.
4. Join the Events with Another Parallel Gateway (AND-join)
After each event, I draw a sequence flow to a second parallel gateway. This gateway merges the two paths.
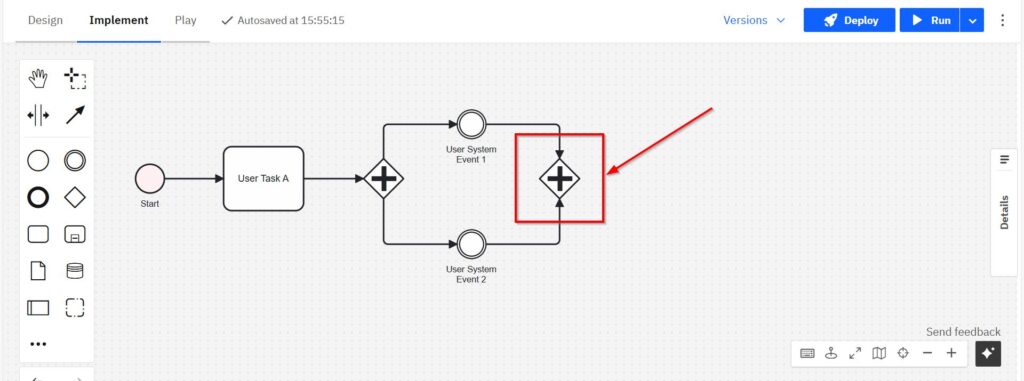
Only when both events are received does the flow continue. That’s exactly what I need.
5. Continue with Task B
Now that both signals have arrived, I can proceed. I add Task B after the second gateway. Task B won’t start until both events are caught.
6. end the process with the end event
Finally, the process ends with the end event.

And that’s the power of this pattern.
Why This BPMN Pattern Works
This structure works because:
- It listens for both events at the same time
- It waits for both to finish before continuing
- It prevents missed signals due to strict vanishing semantics
I no longer worry about the order of the events. Whether Event 1 or Event 2 comes first, the process waits for both. It’s reliable and clear.
Final Thoughts
Handling multiple intermediate events might sound tricky. But BPMN 2.0 gives me the tools to handle it with precision.
I never forget that intermediate events are transient. If the process isn’t listening when they happen, they’re lost.
That’s why I use the parallel gateway pattern. It allows me to catch each event on its own path and merge them only when both are received.
In short, this is how to model multiple intermediate events in BPMN—cleanly, safely, and without confusion.
What’s Next?
Now that I understand the BPMN foundation, I need to look at communication inside the model. A process often does not run in isolation. It exchanges information with people, systems, and other participants. That is why the next article is important. In Understanding Message Events in BPMN 2.0, I explain how BPMN shows sending, receiving, and waiting for messages. After that, I move to the people behind the model. In BPMN Project Roles for Effective BPM, I explain who takes part in BPMN work and how each role supports better process models. Therefore, these next steps help me connect BPMN knowledge with real communication and real project practice.
Explore Processes and Requirements Modeling
Processes help me understand how work moves from idea to result. In my main article on Processes, I connect the full picture. I explain how Process Management helps me structure, analyze, and improve workflows. Then I show how BPMN turns these workflows into clear visual models. In addition, I explain how Camunda supports BPMN modeling in a practical way. Therefore, this guide is the right next step if you want to understand processes, model them clearly, and improve them with confidence.
However, process models are only one part of a larger modeling landscape. That is why I also recommend my main article on Requirements Modeling. There, I connect Modeling Concepts, Process Modeling with BPMN, and UML. As a result, this second guide helps me understand how different modeling approaches work together and how I can choose the right model for the right purpose.
Credits: The diagrams were created with Camunda.
| Read more about Business Process Modeling and Notation (BPMN) |
|---|
| Exclusive Gateways in BPMN 2.0: Clear and Simple Parallel Gateways in BPMN 2.0: Understanding and Using Them Effectively Event-Based Gateways in BPMN 2.0: A Practical Guide Complex Gateways in BPMN 2.0: A Simple Guide |